Sunday, December 25, 2011

Merry Christmas

I forgot. Merry Christmas everybody. 


Here is a gratuitous kitty photo. This is Big Head after he had his Christmas feast - canned kitty food. He is very content as you can tell from the relaxed pose. He is a feral cat that just showed up at my house. I am unable to pet him at this time. He was very skinny when he first arrived, but his head was big even then. Now he is a big fat cat all over. I have to get him to the vet before he causes a kitten population explosion. 


He wishes you Merry Christmas too.

Mineral Wool Insulation - Batt installation (and difficulties)

More insulation information.


The insulation guys are at work. First they sealed the 2 x 6 stud bays with a minimally invasive foam, then they started installing the mineral wool insulation. As I mentioned in my insulation choices I talked about the difficulties of installing batts well. Insulation is graded I, II,  or III based on how well it covers the stud bays. Grade I is the best.


A class I installation  - see the picture below from Alison Bailes Energy Vanguard blog


grade I fiberglass batt insulation, no compression, gaps, or incomplete fill


He says that it is one of only TWO class I fiberglass installations he has ever seen as a home energy rater. 


The criteria for a class I installation include:

  1. Minimal gaps in insulation coverage
  2. Compression or incomplete fill (up to 30% of intended thickness missing)- up to 2% of total area
  3. Walls, rim or band joist between floors - enclosed on all 6 sides, in contact with interior or exterior sheathing
  4. Ceilings - in contact with interior sheathing 
  5. Floors - in contact with interior sheathing (subfloor)
  6. Floors over outdoor air or vented - enclosed on all 6 sides

This is from "Insulation Inspections for Home Energy Ratings - Assessing insulation gaps, compression, and incomplete fill provides a way to measure installation effectiveness" by Bruce Harley in Home Energy Jan/Feb 2005 pp 20-23. 


So here is an example in the shop. This photo shows the minimally expanding foam with some pretty well installed mineral wool around the top but not the bottom. 


The next photos show the installation of the batts. 


Neither of these installations is a class I installation for 2 reasons - too much compression and it does not completely fill the stud bay. You will not get the stated R-value because compressed insulation does not trap air as it should. It functions as a solid material that conducts heat. 

What to do about it? Now that's another question. If I was off tomorrow I would get a ladder, put on protective clothing and I'd fluff the stuff up. I'll talk to my contractor and we'll figure it out. 

Wednesday, December 21, 2011

Insulation Choices

Now that all my Christmas parties are done, I can re-focus on issues about making my houses more energy efficient.

I say my houses like I really own a bunch of property. I have my house built in the 1950s which is less than 2000 square feet but certainly large enough for my cats, 2 doggies, my craft supplies and me. Really my craft supplies and craft magazines take up the most space.

I bought a 1960s house to renovate that is less than a 1000 sq. feet and I rent that out to Kathy and her family. We needed enough space for Kohle, the greyhound, to be able to run.  The house did not have one speck of insulation in the walls unless you count a few widely scattered areas of crumpled up newspaper. It does have some fiberglass batts in the attic that are actually installed better and thicker than the ones in my house.

Ok, so those are my two houses. Well, I’ve been getting into some other buildings that require insulation. One of my family members lives in a mobile home that is less than adequate as a living space. So the first step in getting my brother, John, into a real home is to build a shop. He is a cabinet-maker but he needs space to be able to build cabinets for his new home (and my kitchen, bathroom, my other brother’s kitchen, Kathy’s kitchen and bathrooms, etc, etc.). We (well, really it’s Randy, Carlton, Chris, Don and Buck) are building a beautiful shop for him. We are also using it as practice for the issues you face in building a home.


We are now at the stage for insulation. I thought I would go over my decision-making process for choosing insulation.  I’ll briefly review the choices with pros and cons for the main categories of insulation – fiberglass, cellulose, denim or cotton, and mineral wool.

The shop is on relatively low-lying land in the humid South so moisture control is an issue. Since it is a woodworking shop, fire resistance is also a consideration. I am not considering foam for this particular building so I will not be discussing those choices here, though I will discuss it when we talk about building and insulating a house.

All of these forms of insulation have an R-value (resistance to heat flow) between 3-4. Since they are not very different, the R-value will not be the determining factor.

Fiberglass

1.     Pros – commonly available, cheapest insulation, familiar installation, R value equal to most other insulations except for foam, lightweight, some brands no longer have formaldehyde binder so no off-gassing, sometimes uses recycled glass, resistance to moisture damage and fire are rated as excellent, can be blown in

2.     Cons – high embodied energy in making fiberglass (10 times as much energy to make fiberglass as it does to make cellulose insulation), little recycled content, difficult to install well, more air permeable than most other insulation, prone to convective loops since it is a low density material primarily composed of air, similar problem is “wind washing”, difficult to recycle, cannot compost, questionable health effects from inhaling glass fibers (the fiberglass industry heavily disputes these claims). Itchy unless encapsulated, requires protective clothing

Cellulose

1.     Pros- commonly available, pretty cheap, can install DIY attic installations, R-value similar to fiberglass (generally 3-4 per inch), low embodied energy. No other insulation uses less energy for production. Since it is primarily made out of newspaper, keeps newspaper out of landfill. Ties up some carbon from the newspaper. Borates used for fire resistance and mold prevention are safe chemicals. Can moderate moisture in air. Better air barrier than fiberglass though not rated as an air barrier, compostable.  Good retrofit for insulating intact walls

2.     Cons – holds moisture if it gets wet, fire resistance is less than fiberglass, dense pack installation in walls difficult for DIY (need commercial grade blower, not one from the large stores), wall installation may leave voids, gaps. Can support some mold growth if very wet. No batts available(why don’t we have cellulose batts?), settling can occur if not properly installed, requires dust mask

Denim or Cotton

1.     Pros – very easy, pleasant DIY installation, not itchy at all, somewhat available, R value similar to fiberglass and cellulose, not too expensive, low embodied energy as the material used is recycled, usually pre-consumer though some post-consumer fibers are being used now, no formaldehyde binders, uses borates for mold and fire resistance, sound reduction, no protective clothing required though a mask should be used for cutting the batts, better air barrier than fiberglass though not rated as air barrier

2.     Cons – can be difficult to find, only available in batt form, can’t do a retrofit unless the wall is open, poor moisture resistance, moderate fire resistance, can have gaps, must install carefully behind wires and boxes similar to fiberglass, can be hard to cut (but tears easily)

Mineral Wool – 2 main forms, rock wool from basalt (volcanic rock) and slag wool from blast furnace slag (material that forms on surface of molten metal)

1.     Pros – durable, fire resistant (withstands temps up to 2150 F), no release of toxic gases, will not absorb water, R value similar to fiberglass and cellulose, will not support growth of mold, mildew, bacterial growth, available in batts or blown in, batts are relatively easy to install, a little less itchy than fiberglass, no chemical off-gassing, no fire or mold retardants, no health effects, good sound absorption, better air barrier than fiberglass (though it is not considered an air barrier), can be reused, does not deteriorate

2.     Cons –difficult to find, no local sources, expensive, relatively high embodied energy to produce, requires careful installation like fiberglass to avoid gaps

Conclusion

For John’s shop, I have chosen mineral wool insulation based on its fire resistance, moisture resistance, and sound attenuation. I am not a fan of fiberglass at all and feel that any of others would be superior to fiberglass. Fiberglass just allows too much air to circulate (convection currents, windwashing) through for me to consider that as a viable choice in insulation. I did not choose denim or cellulose primarily because of the moisture issue.

Sources


“Installing Fiberglass Right” in Musings of an Energy Nerd, Green Building Advisor July 2009 http://www.greenbuildingadvisor.com/blogs/dept/musings/installing-fiberglass-right

“A Visual Guide to Why Fiberglass Batt Insulation Underperforms” in Alison Bailes blog, Energy Vanguard http://www.energyvanguard.com/blog-building-science-HERS-BPI/bid/47219/A-Visual-Guide-to-Why-Fiberglass-Batt-Insulation-Underperforms

“Should Batt Insulation be Outlawed” in the Green Building Curmudgeon blog, Green Building Advisor http://www.greenbuildingadvisor.com/blogs/dept/green-building-curmudgeon/should-batt-insulation-be-outlawed


“Insulation Education” by Max Alexander, This Old House Magazine http://www.thisoldhouse.com/toh/photos/0,,20435285,00.html

“How to Make Your Home More Energy Efficient” TLC website http://tlc.howstuffworks.com/home/how-to-make-your-home-energy-efficient7.htm

“What is Wind Washing (and why every homeowner should know)?” by Erik North July 8, 2011 on the Energy Auditing Blog http://www.energyauditingblog.com/what-is-windwashing-and-why-every-homeowner-should-know/

“Fiberglass-Batt Insulation” in How It Works – The Mechanics of Home Building by Rob Yagid in Fine Homebuilding August/September 2011 http://www.finehomebuilding.com/PDF/Free/021221018.pdf

“Heat Transfer Through Insulation” in How It Works – The Mechanics of Home Building by Rob Yagid in Fine Homebuilding September  2009 pp. 16-17 http://www.finehomebuilding.com/PDF/Protected/021206016.pdf

“Insulation Comes of Age” by Alex Wilson in Fine Homebuilding, March 1, 1996,pp 46-53 http://www.finehomebuilding.com/PDF/Protected/021100046.pdf


“Blown Cellulose Insulations” in John Brooks Real Homes for Real People Blog. http://johnbrooksbuilder.com/articles/cellulose.htm

Monday, December 19, 2011

Wreath Parties #3 and 4.

Well, the final wreath party is done. I had planned having 2 parties on consecutive nights to make it "easier" on me and so everyone where I work would be able to attend. We work 24/7 so whoever works Mondays is almost always off on Tuesdays. It wasn't really easier on me because I worked a 12 hour day shift the day before the parties and the day after. That's was a scheduling faux pax that I will not repeat. 


Anyway, several people weren't able to come so I had "make-up" wreath parties - one with my friend Mendy and one with Ada and Dawn and their kids. Here are some photos from the last 2 parties.  You've already seen Mendy's wreaths. 


Mendy's front door wreath

Mendy's back door wreath

Mendy's mom wreath


For my friend, Karen who could not make it to the party. 


Ada's grandkids - Skye, Asaiah and BJ on the floor in the porch

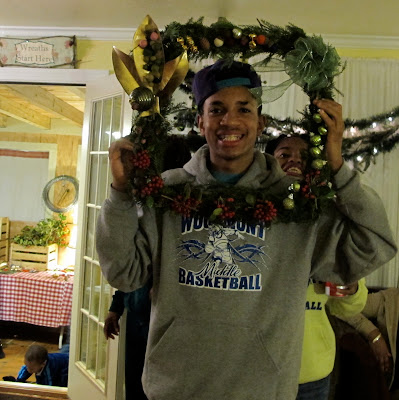
Ja'Kobe with his wreath, I never spell his name right. He has a lot of personality as do all the grandkids. 

Asaiah with her wreath and her cousin, BJ. I also make an appearance in the mirror. Somehow I am very good at taking shots of myself in the mirror. 

Tiffany looking beautifully color-coordinated with her wreath. 
Dawn's kids are very quiet and were diligently working on their wreaths so I did not get a photo of their creations. They also made a little basket with a "Charlie Brown" tree in it. Very cute.

Tuesday, December 13, 2011

Bernina Abuse - Gift Card Wallets

Well Lynn, I finally learned to use my Bernina. I've made gift bags, curtains and now gift card wallets. Though I don't think that they designed these beautiful machines for the my last project. I've been sewing on scrapbook paper to make gift cards. 


I've  been wanting to make some wallets like the ones in this post on Just Something I Made blog. I love this design. She did an incredible job, including rounded corners which I could not master in the time I had.


The only problem with making a paper wallet was that I needed to learn how to use my brand new Bernina. I think it sat forlorn and unused (except for cats nesting on the top of it. They balance there quite nicely.) for over a year. The Bernina store kept calling me about my free lessons, but I never could come up with time to go.


So finally I pulled out the manual and learned to thread the thing, fill up the bobbins and go to sewing. First I made the curtains for my porch. Then I made gift bags for goodies for a Head Start school that we have adopted at work. 


Now I've made paper gift card wallets for the teachers at the school. I googled ways to wrap gift cards and didn't find anything that looked as good as this paper wallet. As a result the Bernina had to suffer the indignity of sewing paper. She did really well despite it being beneath her. 


Here are a few examples. 


I photographed the gift card wallets on a far too warm, but extremely beautiful December day. 


Don't worry, I will dust off the Bernina and get her back in shape for sewing what she is designed to sew - cloth. 

Saturday, December 10, 2011

I have a problem

The photo is clearly worth a thousand words.


The real problem, though, may not be evident. You might think the problem is my obsession with ribbon, but that is not the problem. The problem is what to do with all of this ribbon. I managed to consolidate several boxes (well, 2) and have the ribbon organized by types and colors. I think I can fit (hide) all of it under my bed. 


See,  that is much better. I feel better about it in any case.

Thursday, December 8, 2011

Finally, The Wreaths! Part 1

Ok, this is not the big reveal because I don't have photos of many of the wreaths, but this gives you an idea of what is made at a wreath-making party.


It's not really designed to be a party for kids, but the kids who did attend were great at the party and came up with great designs. And if they didn't make a wreath, they were very entertaining anyway.


This is Elysia posing with her wreath. She was a very enthusiastic participant.


Group photo of the first night party.


Luke did not want to leave the party. 


Casey and Cooper evaluating her wreath. Luke, Audrey Ann and Emma Kate posing for the camera.


Sara's turn to show off her artistry.


Sara's wreath at home. You can tell she is proud of it as she should be.


Zachary's wreath.  


Ryne's wreath. I hope I spelled his name right.


Cindy is a big Clemson fan and always has this tiger on her door. She designed her wreath to go around the tiger. I think it is beautiful.


Mendy makes most of the bows for me. She wasn't able to attend the official party so we got together on a Saturday to make some wreaths. Mendy made 3 of them that day.


I made a wreath which I mailed to my sister for her birthday.


I also spray-painted some magnolia leaves gold and bronze hoping that they will last more than one Christmas. We'll see. 


My brother was the official wreath photographer. I have not yet received his photos yet. That will be part 2. 

Thank you everybody for making the party a success.

Saturday, December 3, 2011

Woodland Christmas Decor

When I decided to make my log boxes for the invitations, I also decided to use a woodland theme for my Christmas decorations. That meant natural materials, greens, browns, and golds. No red. Well, not in the main room anyway. The porch had plenty of red. 


Here a few photos of the woodland theme. 


Christmas tree in green, brown and golds - this is the top of the tree


Overall view of the tree


The fox ornament. Notice the extreme rain through the windows. The day of the first party was seriously rainy. 


I just love what that Jo Ann did here. I had saved some bird's nests that I found to use as decorations. She placed them in the tree and added some Christmas balls as eggs. Then we placed a mother bird around behind the nest. It is my favorite part of the tree. 


Jo Ann also covered some tin cans with my woodgrain fabric. I didn't know what to use them for at first,  then it became obvious that they should hold the bamboo spoons and forks. This was a big hit at the party. 


General design of the serving table. Ben cut some logs for me to use as serving platters. Also a BIG hit at the party. 


Cupcakes were also served on a log, but really a much larger slab with many more cupcakes than shown in the photo. I neglected to take a picture at the party. I get very nervous before a party so I was not able to document how lovely it looked thanks to all my wonderful helpers.


Next post will show the wreaths themselves. Everyone really made beautiful wreaths. 

Thursday, December 1, 2011

Signs for the party

I planned to post lots of progress photos as I got ready for the wreath-making party, but as the time approached I got more and more anxious about getting actual physical stuff done for the party so I did not manage to do any blog posting. 


Things are more relaxed now so I am able to give you an idea of how things went. 


First I would like to thank everyone who helped me - Kathy, Matt, Sioban (Kathy's grandaughter), Alison, Chandler, Pressley, Mendy, Randy, Martin and his painting helpers, Jo Ann and Rich, Ben and John, Carlton and Chris. If I have forgotten someone, please do not think I am ungrateful, merely forgetful. 


I told Kathy's son, Matt, that I had this vision and that he was helping me realize the vision of how the party should look. One of the important visual elements I imagined was a set of signs to help guide people at the party. The only one I managed to make was the "Wreaths Start Here" sign. I was very proud of it, but quite dismayed that I couldn't do the others. Enter Alison, Chandler and Pressley. Alison and her children are very creative and good at scrapbooking so they made me the rest of the signs.  They saved the vision.

This sign leads to the porch where the greenery and wreath forms were. 


Alison made the cupcake sign. Cupcakes were displayed on some slices of tree trunks that my brother cut for me. That will be in another post.


 Alison's son, Chandler, made my food sign over the food table.


Pressley, Alison's daughter, made the "Decorate Wreaths Here" for the area where we added embellishments to the wreaths - bells, balls, etc.


Pressley, Alison's daughter, made the "Decorate Wreaths Here" for the area where we added embellishments to the wreaths - bells, balls, etc.


I was very tickled about the signs. When I got party ideas I went to some party websites like Hostess with the Mostess. They always give credit for  the "printables" at the parties. I could not have been more happy about my printables courtesy of Alison and her family.

Sunday, November 13, 2011

$4 curtains for the Christmas Party

I have been working hard on organizing and cleaning for the Christmas party. My dishwasher gets fixed on Monday. Painters come on Wednesday to paint my living room, den area. That means I really have to get to the cleaning duties.

One way to do that is to get my porch cleaned up so I can use it as a staging area. I needed some easy curtains so I decided to make them out of canvas drop cloth. It's cotton, it's cheap; $15.98 for 4' x 15 yards. I also saw a fabric outlet that sold red burlap webbing for about 80 cents a yard. So I decided to combine the two. It's not perfect, largely because I didn't really measure anything but it will look fine for the party and I can add a different border later on. I think this works out to about $4/curtain. So for 9 curtains $36, not bad.


I cleaned out my refrigerator and it is beautiful. So nice, in fact, that I don't want to put anything into it.


And after I finish a difficult task (i.e. cleaning) then I reward myself by doing something crafty. I have further refined the little log boxes. I figured out a way to use a wooden disk at the end. Just glue a strip of cardboard and the disk. Glue one end to the toilet paper roll. Make the top disk a little larger so you can get it on and off. I drilled 2 tiny holes in the top to attach the acorn. I plan to do a tutorial on log boxes probably after my party.


I've been making some really cool things that I am very excited about. I'll post them later too.