Showing posts with label Energy Efficient Home. Show all posts

Thursday, August 6, 2015

July Energy Usage

I am still seeing incredible benefits to the insulation and air sealing that I did in March through May of this year.

Remember, though, that I had 3 other people here last July with 3 TVs and the computers and routers were not completely switched off.


I don't think I set the temperature lower last year because my sister and her husband got cold in the house and my brother lived in the basement where it is 10 degrees cooler. This summer has been substantially hotter than last summer. The chart  below shows some July temperature averages from the past 15 years. The lowest temperature for July 2015 was 67 degrees, the highest 98. The lowest MAXIMUM temperature was 82 while there was a day last July where the high was only 69. This year's average high temperature was 91.9 and the mean temperature was 82. Last year's mean was 77.9. It has been much hotter this year which makes the drop in energy use even more impressive.


I will continue to monitor the energy use. My brother moved into his new home in September 2014 and my sister and her husband moved away in October so I should have better comparisons for one person living in the home after that time.

Also, remember that I insulated only to about a level of R-20 just over 1/2 of the current code requirements of R-38. When the weather cools off, I will be up in the attic again making some structural changes and increasing the insulation to around R-50.

Saturday, July 4, 2015

Energy Benefits from Attic Insulation - June numbers

I got my Duke energy bill yesterday. My electric usage continues to be much, much lower than last year. I did have 3 more people here last year though. The one point I would like to make about that though is that none of them really ran the air conditioner more than I would have. My sister and her husband got cold in my house and my brother lived in the basement which is substantially cooler than upstairs. There were 3 TVs in the house at that time that was probably a significant energy drain. I don't have a TV. Also my computer and my router are on switches that are turned off when I am not using them.

Anyway, here are the numbers from June which was a very hot month. Days were often right at or above 100. I was very comfortable in my home.


Usage less than half compared to last year. I am very pleased with that and the improved comfort level.

Sunday, June 7, 2015

Attic Insulation - May Energy Report - Proof that it WORKS

I could't get my scanner to scan so I had to make do with an iPhone photo. 

In March and April I spent many hours in my attic air sealing and insulating hoping that getting the insulation to an R-20 level would make a difference. I have plans for putting in 10-12 inches of blown-in cellulose in the fall after I do some more work up there such as beef up the rafter supports for one thing as my roof is only held onto the house by a few nails toenailed to the rafters.

I elected to use denim because I was SO tired of itching from all the mineral wool insulation which I love, but I do not love the itch that comes with it. Denim is a dream in terms of installation compared to mineral wool. Still mineral wool, specifically Roxul (Carlton, my carpenter, calls it Roxie), is my all time favorite insulation. Just remember that even when I talk fondly about denim as an insulation material.

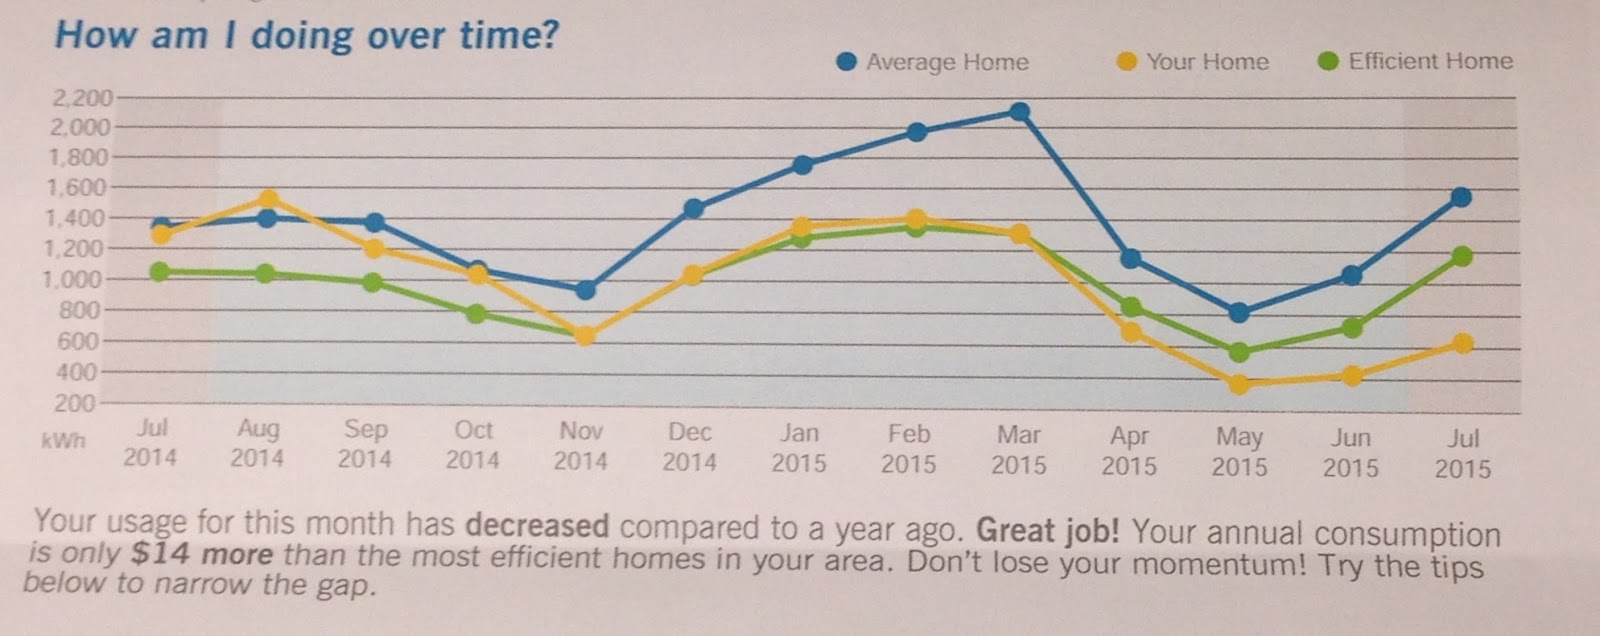
Anyway, I got my May energy report from Duke Energy and I used about 15 KWH per day for a total of 428. Though on my energy report it shows only 368 for the month. They must have used a different interval for their report.


I have saved all my energy bills for more than 10 years, but I can't find the complete collection for a better analysis. I do have some from this year and last though for comparison. My sister and her husband lived with me from December 2013 to October 2014. Also my younger brother lived in my basement while we were building his house from sometime in 2013 to September 2014. You can see the drop in consumption in November with only one occupant, but I was above the green energy efficient home during the winter, probably from heat loss through my attic until I started insulating the attic in March.

So I have graphic proof that just getting my attic to R-20 has made a big difference in energy use. I will tell you that the house is so much more comfortable.

One of these days I hope to show a chart of energy use correlated with the work I've done on the house - metal roof, 2 inches of polyiso under the HardieBoard siding, new windows, attic insulation, etc, but that will take some research.


Wednesday, February 11, 2015

Door installation with Exterior Insulation

I don't have a big readership of my blog which is fine with me. I mostly put the construction stuff out there to help anyone else who might be trying to build or renovate a better, more comfortable, more energy efficient house. Every once in awhile I get a question about the actual construction of John's house and I certainly want to help if I can.

One reader asked a question about installing the doors with the exterior insulation, the Roxul mineral wool Comfortboard. Here's the question:

Hello, wanted to say great job on the house! 

Im currently gutting a 1930's bungalow down to the frame & sheathing & am planning to add roxul comfortboard to the exterior. I see you went with the approach of mounting the doors and windows to the outside of the now-thicker walls. The windows are easy, but I'd like to see or hear about how you did the doors. Did you fir out the door opening, mount the door to the outside of the thicker wall, then trim the difference inside? If so, does this stop the door from swinging open fully? Thanks for any input on this detail....there is so little info online about the door installs on these exterior insulation jobs.

From looking at the photos the doors were installed on the outside of the thicker wall and trimmed out on the interior. It probably does prevent the door from opening more than 90 degrees. Here are some photos that might help explain it better than I could.

Back Porch Door with Polyiso around the edges, taped

Back Porch Door Opening

Front Door Framing with tape before installation
Close-up view of door framing
Installed Back Porch Door showing the thickness of the wall
Front Door Sidelights installed
Another Porch Door fully opened - looks like it opens just past 90 degrees
The only 2 articles I could find that address this issue are listed below. Green Building Advisor (GBA) is the single best place to get information. You do have to sign up to ask questions, but it costs nothing as a regular member and you get great advice from people who know their stuff.

Here is a similar question on GBA to the one you asked:

http://www.greenbuildingadvisor.com/community/forum/energy-efficiency-and-durability/37017/window-and-door-installations-thick-walls

This is an article in Fine Homebuilding where they address your question when double stud walls are used:

http://www.finehomebuilding.com/design/departments/energy-smart-details/windows-and-doors-in-double-stud-walls.aspx

So I hope this is helpful.

Tuesday, September 2, 2014

Certificate of Occupancy and Housewarming Party!!

We got the Certificate of Occupancy on Friday, August the 29th! What a relief that is. John has been very happy about that. We still have lots of details to do. I hope to have some good photos this evening.

We have planned a housewarming party on September 13th from 4pm to 9pm. Hope to see people there.

I'll post more later. Thank you for reading about the house that took so long.


Saturday, August 23, 2014

Why We Built the House on Piers (instead of a Crawlspace)

While we were working on the house today, suddenly a storm came up and dumped buckets of rain. This is the view of the front yard with two little rivers running through it. On the right side near the road you can see the creek that the beaver's have dammed up. We need to work on it some more to try to get that down.


This is a view of the front entrance porch. We have not added more gravel to the driveway because it always gets messed up when they move the dumpster. We will do that in a week or two when the dumpster leaves for good.


Another interesting day at the house.

Thursday, August 14, 2014

Blower Door - Slight Disappointment

Ok, we had what was supposed to be the second and LAST blower door test, but I am not happy with the result and I may have Dean Benton of Benton Green Energy come again after I have fixed some problems. 

Blower door reading on August 6, 2014

You may recall that a blower door test helps determine how much air leakage you have through the building envelope. The test involves putting a fan in an outside door frame and depressurizing the home to accentuate the air leaks. The house is depressurized to a level of 50 pascals which is about equivalent to the force of a 20 mph wind on the home. There are 2 main values that you get from the test - one is directly from the manometer as shown above and one is calculated based on the volume of the house. This article, Blower Door Basics by Martin Holladay on Green Building Advisor (GBA) explains it much better than I ever could.

Blower Door Set-up while we were at the rough-in stage. 

The number shown on the manometer above is called cfm50 or the amount of air that moves through the home at 50 pascals of pressure. The other number is ach50 or air changes per hour at 50 pascals.

Our previous reading was 98 cfm 50. The above reading is 235, but I think it leveled out at 220. In any case, the number has more than doubled - 2.4 times greater than the last blower door.
What happened??

Well, I have some ideas.

What do you think about this dryer vent? Do you think that there is some leakage around this pipe?

Dryer vent through the wall, not sealed around the vent pipe. This was installed AFTER the first blower door test.

What about the vent cover for the kitchen fan? Do you think that those little plastic louvers seal out air?

This flimsy plastic piece covers one of the fan vents. A similar cover was on the dryer vent. 
Now the photo below may show a less important air leak. This is the inside view of the Lunos e2 - a heat recovery ventilator (HRV) that exchanges outside air for inside air. It does go through the wall in large tube. We did seal the tube to the sheathing inside and out before the walls were closed in. Still it is designed to move air through the home. You may wonder why we go through all the trouble to seal up every possible hole in the building envelope and then deliberately install a fan to exchange air. Well, when you have a very well air sealed home, you need to move more fresh air through for the inhabitants, but it needs to be filtered, conditioned air, not random leaks. That's what the HRV provides.

Lunos e2 Heat Recovery Ventilator (HRV)
The reason I did not calculate the ach50 is because I am confused about the volume of the house. The house is a Cape Cod design with kneewalls and sloped ceiling upstairs so I don't really know what counts as the house or not.

For example, the space above the bathroom and the bedrooms is not really sealed off from the rest of the house. It is within the thermal envelope of the building. Do I count that? I think so, but I am not sure. I am going to post a questions on Green Building Advisor to get their advice.

Area above the bathroom. You can see the Intello Plus smart vapor retarder from 475 High Performance Building Supply. The ceiling joists are insulated with dense pack cellulose. There will be a small door that fits in the opening. It does not set tightly to the frame, however. Is this within the thermal envelope?

So, the big change from the rough-in stage to almost completion (I know, almost completed at 18 mos later - crazy ) is the vents. We taped cardboard over the area where the vents were during the first test, but I don't know if you tape over vent covers when you go for the final test. That's another question for the knowledgable people at GBA.

I'll let you know more later. Thank you for visiting here. 

Saturday, July 26, 2014

You May Ask Yourself - Where are they with their beautiful house?

Ok, so it's July 26th and this is the first post of the month so you may ask yourself - are they really working on the house? Yes, yes, always yes.  We always work on the perpetual house.

Here are a few views of where we are now.

This is the enclosed porch with floor stained. You can see the stone pad for the Jotul stove in the background. We put it on the enclosed porch so we could isolate any air leaks from the stove from the main part of the house. There are 2 windows and a door connecting the house with this porch so we can easily open the porch to the main part of the house should that be needed to heat the house.


This is the opposite end of the enclosed porch with the front door and now the floor has one coat of Waterlox finish on it.


Guard dog at the plumbing supply warehouse. We bought a really beautiful Toto Promenade toilet from the people here. We were very quiet while we waited for our toilet delivery so we wouldn't get the dog riled up. I'll try to get some photos of the toilet later this week.


This is the hanging light over the stairway. We waited quite awhile for it to be installed. The colors on the wall are somewhat distorted. These hallway walls are painted with a color called Aqua Pura - a light clean blue, sometimes looks white when the sun is shining on it. John hates it, but the True Turquoise used most other places in the house is too dark. He can paint over it if he wants to take the time to do so (but he won't).


And what have been doing for the last month or so? Taping, foaming, taping. Here are few photos so you'll have a better idea of my current projects. This is a cropped view of my foam face. I was foaming around the ducts underneath the house and got splatted with foam. I kind of had to sand it off my face before I went to work the next day.


Protective gear to prevent "foam hair" which is a real problem to deal with.
And here is unfinished my masterpiece - the Pro Clima membrane under the house taped to the enclosed duct work. This is the best view of the membrane. It's somewhat difficult to take a good photo that illustrates how involved it is to seal under a house. This topic absolutely deserves a lengthy post of its own.


There is still a lot of work to do under the house. That's why it's my unfinished masterpiece. I will keep you informed. 

Thanks for reading this blog on the perpetual house. Hope to be finished with this project very soon.

Sunday, May 4, 2014

Extreme Air Sealing - the Crawlspace Edition


Air sealing the duct work to the subfloor. The interior side of the duct work is taped as well. I like redundancy in air sealed layers.
As any regular readers of this blog will know (assuming there are regular readers of this blog outside of my friend, Lynn), I am crazy obsessed with air sealing. After studying how to build an energy efficient home over the past 4 years, this is clearly the most important first step in that direction. Also it happens to be something I can actually do. You don't have to measure or cut precisely, you just have to crawl or climb around to awkward places to squirt foam, goo or tape any and every potential opening in your thermal envelope - the separation between inside and outside. I am capable of doing that.

The last step in air sealing this house is sealing the duct work and connections in the crawlspace. I don't know if John's house technically has what you call a crawlspace because it is built on piers and the space is open to the outside, but it seems like a crawlspace when you have to crawl and duck floor joists for hours at a time.

As I noted in an April post, the HVAC ducts are sealed with some kind of DUCK tape which really doesn't hold well for any length of time - meaning for years of the usefulness of the duct work. I did not take off all the fiberglass insulation and re-tape the ducts with a more long-lasting tape. I just could not make myself do that, but I did reinforce EVERY SINGLE JOINT and EVERY SINGLE PIECE of DUCK TAPE with a very adherent and long-lasting tape, mostly Siga Wigluv. I am hoping that the ducts are so well encased that they won't move much and the tape underneath the fiberglass insulation sheets holding the ducts together will last better.

This tape has only been on for a couple of months and is already loosening. You can see here I have reinforced other areas with Siga Wigluv. I did that on every duct.

This is another example:
You can see all the little strips of paper from taping the pipes.

After the sealing is complete, then I will insulate the 9.25" joist bays with 2 layers of Roxul Mineral Wool insulation - 5.5" layer and a 3.5" layer. The ducts themselves will be encased in the leftover polyisocyanurate foam which you see on your left. I haven't figured all those details for insulating around the ducts yet. 

Rich finished the interior painting, John is building bathroom vanities and I am crawling around underneath the house, sneezing like crazy - air sealing which is what I do best. That's where we are today.

Friday, April 18, 2014

Insulation and the Service Cavity

I was going through some photos of construction of the house and realized that I didn't do any posts about the dense pack cellulose and the smart membrane, Intello Plus.

I was a little disappointed at the dense pack cellulose because the insulation contractor didn't do it like I had seen in videos and it didn't seem dense enough. I read that the installed cellulose is supposed to feel like a firm mattress, but ours only felt that way in some spots. I actually cut holes in several spots to see how well the cellulose held up and it didn't settle. It wasn't as dense as I would have liked, but I think it is adequate. I hope so in any case.

Here are some examples of the Intello Plus and the dense pack insulation. Also there are some areas around the second floor rim joist insulated with Roxul mineral wool insulation. You can see the 2" x 4" service chase on the walls, room for electrical and plumbing so it does not take up insulation space in the 2" x 6" wall space.


You can see the see the service chase in the kitchen much better here.


Monday, April 14, 2014

Crawlspace Challenges

Ok, it's mid-April. We still do not have the construction loan. I don't know how that is possible, but that's the reality.

So we've been working on the house doing whatever we can do. My current focus is air sealing the penetrations in the crawlspace area. This is my job because I like it and I am physically the most flexible in terms of crawling around under the house. In addition I value air sealing more than anyone else involved in this project.

Sealing drain pipes:

Prosoco Joint and Seam Filler around one of the drains. I love this stuff. 

Sealing around duct work:

Air sealing around duct work isn't easy. It's hard to get into some of these spaces. I will foam the really tight areas.
Sometimes I use the Siga Wigluv and sometimes I use the Pro Clima Tescon Vana tape. I primed the Advantech subfloor with a primer first to make the tapes stick better.

Oops! Forgot this one:
Also need to tape the gap in the insulation barrier as well. 

What kind of tape is this? Looks like duck tape.


I think the tape they used to seal the duct joints and to tape the insulation to the ducts is a form of Duck Tape called HVAC duct sealing tape. Regular DUCK tape is notorius for not adhering well over time. All of my ducts are taped with this stuff. I am hoping that the DUCK brand HVAC duct tape is much more adherent that the other duck tape. I am a little skeptical that this will work to keep my ducts from leaking.

The most reliable product for this application is duct mastic which retains flexibility over time and will adhere for many, many years. The reason it is not used as much is because it is seriously messy. The tapes I've used have been field tested in Europe for years and have found to be reliable.

So my crawlspace dilemma is - cut off all the insulation on the ducts and reseal the joints with either mastic or the european tapes or reinforce the tapes on the the exterior of the insulation and hope for the best.

The truth is that I am tired. I've spend quite a number of hours under the house already and I just don't think I can make myself re-tape all the duct joints. In addition, I have already planned to encase the ducts in polyiso foam boxes to nailed and taped to the underside of floor to further insulate them from exterior temperatures. I think that this second layer of reinforcing insulation will ensure that the conditioned air will get to its intended location in the house.


Wednesday, February 19, 2014

February stalemate

We hit a little snag in finishing the house when we got rejected for our construction loan. Truthfully, we asked for it way too late and that made the underwriter uncomfortable. He said he was afraid of liens from the subcontractors and that is why our loan was rejected. We could have asked for lien waivers from the subs because everyone has been paid already, but they didn't ask for that.

So we've gone to another bank and it looks very promising. We've got some more paperwork to do, but that's always true, isn't it?

I hope to have a confirmation for the construction loan within the next week so we can crank up the construction again.

Here is another view of the house with a little snow still present 2 days ago. We had our second snow this year which was predicted to be "catastrophic" but it was not that bad. We didn't have a lot of ice which is what saved us. That means the power did not go out, thankfully.  Oh, and today the temperature got up to 72F.


And now a few views of the inside of the house with the drywall in place. This view faces the back door and the stairway.


View up the stairs toward the front dormer.


Upstairs bedroom. We had to build a mechanical chase to bring the HVAC ducts upstairs because I wouldn't let them run ducts in the walls and interfere with my thermal envelope.  I also insisted on metal ducts for efficiency, no flex duct allowed.


View into the upstairs bathroom and stairway. The bright light in the ceiling is a sun tunnel to bring light what could be a dark area. There is also a sun tunnel in the upstairs bathroom as well. They really works! The open area over the bathroom is access to mechanicals and storage area.


This is the enclosed front porch showing where the wood stove will go. Today Carlton just finished installing the hearth and the slate on top. The stove will be installed at an angle to the corner.


That's it for now.

Wednesday, January 29, 2014

Two Days Later


The photo I posted on Monday, January 27th - 2 days ago was taken when the temperature was in the 60s.

Here is today's photo with the temperature in the mid-20s.


We didn't get a lot of snow, but it happened in the middle of the day when the temperatures were in the 20s and everything froze on the road as people were driving on it. The snow was totally packed down into a layer of ice that was challenging to drive on. Driving home from work around 7:30 pm was fine until I got about 3 miles to my house, then the traffic on the main highway was at a standstill. I drove around a back way where the roads were fine. Until ... I got about 2-3 miles to my house on another road and it was a dome of ice. Cars were sliding all over the road. I witnessed 1 wreck and 2 cars sliding off the road. I decided to park at a little vegetable stand and walk most of the way home then have my family pick me up. As we went on a overpass we could see the main highway near my house and it was bumper to bumper traffic stopped on the highway.

Today driving was fine. We had enough sun to melt most of the ice. Shady areas will continue to be a problem for a day or two. I don't think many people lost power because ice on the trees was not a problem.

I checked the temperature in John's house - it was 40 degrees with no heat source on and outdoor temps ranging from the teens last night to 20s in the daytime. I am very happy with the thermal performance of the house.

Monday, January 27, 2014

January Status of the House


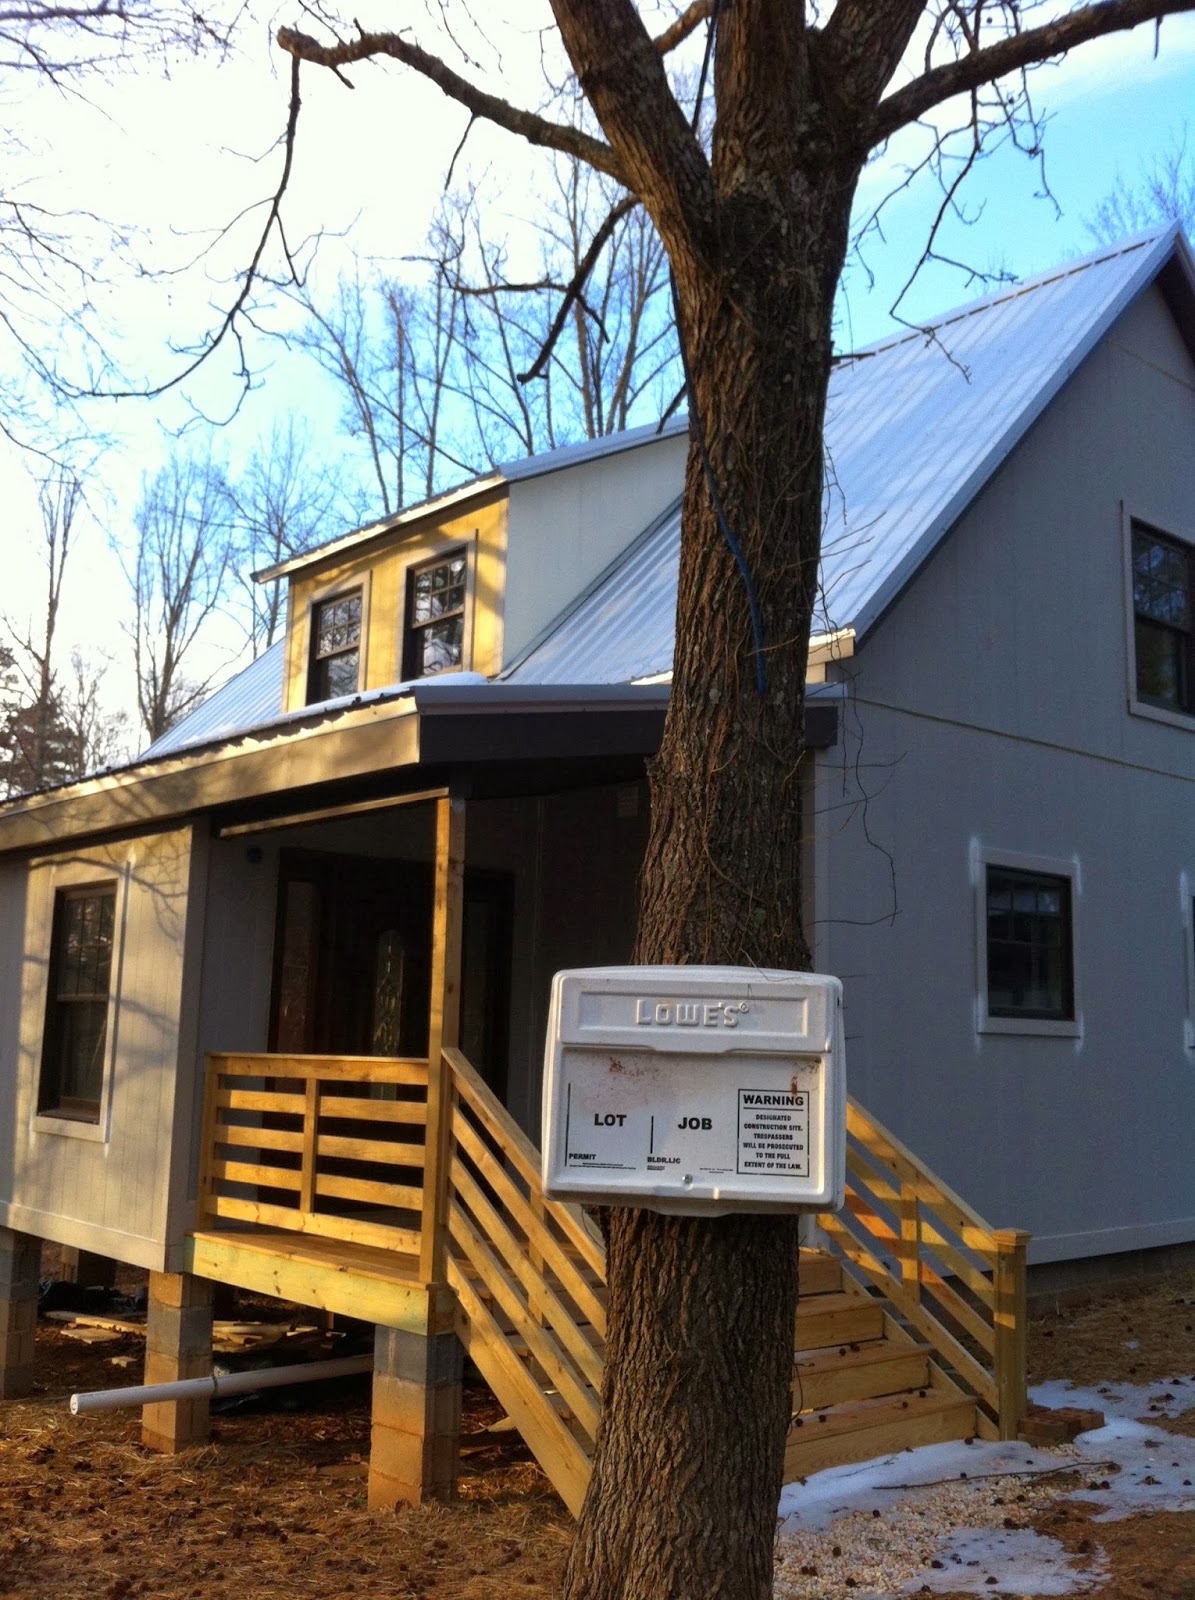
Ok, so here's where we are right now with the house. Front view of the house with the new railings.

Here is a view as you approach the front door. I think the door we refinished looks great. Carlton did a great job on the stairs and the railing.


Now here are a few photos of the inside of the house showing the blown-in cellulose insulation and the service chase. This is the service room with the water heater, heat pump, and the washer/dryer.


Next is a view of the dormer insulation.


Insulation around the upstairs bathroom.


And finally a cute cat photo. This is Daisy and Rocky napping together.


I have a lot of stuff to cover about the house, but that will come later. Ya'll take care of yourselves.