I have been quite delinquent in blogging since early November which often means that a lot is going on.
We've got John's house close to the first real inspection. We need HVAC and installation of ducts, then the inspection. Then we can drywall.
Lots of developments at home as well. My sister and her husband have moved to Greenville from Salt Lake City. My brother, Ben and I flew out to Salt Lake to help them drive back. That was a pretty grueling 5 days because we followed one of the major storms across the country. Then we had to get them settled in my house and get my sister set-up to work from home.
Anyway, I just wanted to write a quick note saying "Happy Holidays". I hope you had a "Merry Christmas" as well.
Thursday, December 26, 2013
Tuesday, November 5, 2013
We did it!! Great blower door result
This is just a brief post about our blower door test today. I was hoping for about 1ach50 which translates to 1 air change per hour at 50 pascals of pressure. 50 pascals of pressure is about equivalent to the pressure exerted on a house by a 20 mile per hour wind.
We hit .48 ach50 which is below the necessary standard for Passivhaus. I am so excited. Carlton and I were high fiving because we did it. We made a really air tight building enclosure.
Now after worrying about this for days, I have to go to my real job so I can
pay for the house.
Thank you everybody for all your help in making this an air tight house.
We hit .48 ach50 which is below the necessary standard for Passivhaus. I am so excited. Carlton and I were high fiving because we did it. We made a really air tight building enclosure.
Now after worrying about this for days, I have to go to my real job so I can
pay for the house.
 |
| This is the actual result. It is hard to see but the result is 94 cfm50 which translates to .48 ach50 when you correct for volume. Dean Benton of Benton Green Energy was impressed with the result so he is taking a picture of it as well. |
Thursday, October 31, 2013
Progress on Halloween - the Metal Roof is done
The roof guys essentially finished the roof today. They have to come back to completely install the roof around the pipe for the woodstove which will be on the front porch and complete the installation of the roofing around the sun tunnels on the back dormer.
 |
| Front view of the house. I just think the roof looks wonderful. |
 |
| Side view of the house. The flashing on the end of the front porch is not done because that is where the wood stovepipe will go and they have to cut around the pipe and flash it. |
 |
| Back porch and side porch. The dormers have been painted because the roof is so steep you couldn't stand on it to paint. The trim on the front of the dormer is not painted yet. The hole on the side of the dormer is where the Heat Recovery Ventilator (HRV) - the Lunos e2 - goes. |
 |
| This is the driveway side. The roof looks so much better with flashing on the end. You can see where we are debating about trim colors - the top color on the side trim is called "Earl Grey" below it is John's favorite called "Hopsack". I like the darker color better. The siding will be painted "Adobe White." |
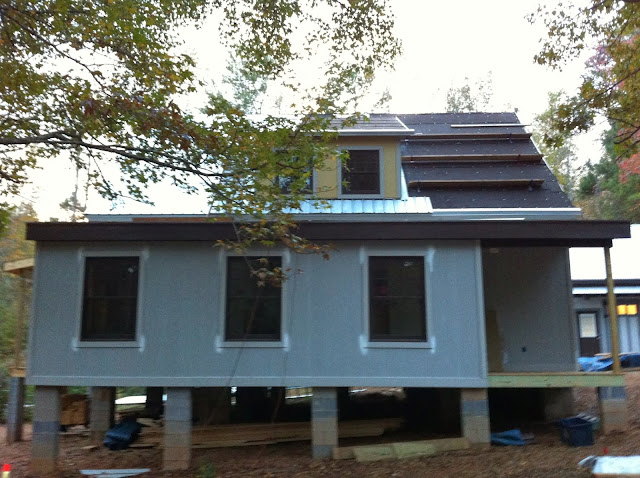
Wednesday, October 30, 2013
Where we are today - the end of October
I'm doing this post to show people where we are in the construction process because everybody asks me "How is the house coming?"
Below are few photos of the exterior. The metal roof is almost done. It looks beautiful. It is shiny and bright which will help a lot in the summer in terms of reflecting the sun's heat.
Front view of the house, the roof has been installed on more than 1/2 of the steep part of the roof. They will install porch roofing last. These are iPhone photos and the light was going so the pictures are a little blurry.
Side view of the house. I really like the detail of the roof and the overhang. John will cover the porch columns with some other wood to beef it up a little bit. The porch will also be stained. The piers look crooked in the photo but that is just distortion from the camera.

Back side of the house. Those boxes on the top are for the sun tunnels to provide light to the upstairs bathroom and the stairway. You can see how nice the roofing looks.

This is the driveway side - the 3 windows are the upstairs bedroom window, the kitchen window over the sink, and a small fixed window in the downstairs bathroom. I realize it is not very symmetrical or aesthetically pleasing, but we needed the back corner room for utilities and a window didn't fit. Also the window in the bathroom has to be small because there is a shower in there. And you know what happens to windows in showers - moisture issues. So this view of the house is kind of goofy, but I think with landscaping we can make it look much better. I would like a small patio on this side between the stairs to the porches.

Below are few photos of the exterior. The metal roof is almost done. It looks beautiful. It is shiny and bright which will help a lot in the summer in terms of reflecting the sun's heat.
Front view of the house, the roof has been installed on more than 1/2 of the steep part of the roof. They will install porch roofing last. These are iPhone photos and the light was going so the pictures are a little blurry.

Side view of the house. I really like the detail of the roof and the overhang. John will cover the porch columns with some other wood to beef it up a little bit. The porch will also be stained. The piers look crooked in the photo but that is just distortion from the camera.

Back side of the house. Those boxes on the top are for the sun tunnels to provide light to the upstairs bathroom and the stairway. You can see how nice the roofing looks.

This is the driveway side - the 3 windows are the upstairs bedroom window, the kitchen window over the sink, and a small fixed window in the downstairs bathroom. I realize it is not very symmetrical or aesthetically pleasing, but we needed the back corner room for utilities and a window didn't fit. Also the window in the bathroom has to be small because there is a shower in there. And you know what happens to windows in showers - moisture issues. So this view of the house is kind of goofy, but I think with landscaping we can make it look much better. I would like a small patio on this side between the stairs to the porches.

Tuesday, October 29, 2013
Mahogany Door - Almost Finished Refinishing
After several weeks of serious sanding, followed by stain and several coats of spar polyurethane, the door is essentially finished. I think there are a couple of spots that need to be touched up, but I think it looks great.
Here is the panel that I sanded. The color really looks more like the color in the first photo. But it is so much prettier than it was when we got it.

 |
| There were a few blobs of bristles and thickened varnish that I lightly sanded off with 600 grit sandpaper. They need a new coat of varnish (polyurethane) on top. |
Here is the panel that I sanded. The color really looks more like the color in the first photo. But it is so much prettier than it was when we got it.

John is ready for it to be put up in the doorway, but Carlton is going to wait because people will be bringing drywall, wood flooring, tubes to blow in cellulose, and other supplies through the door and he doesn't want the door to get dinged up.
Should anyone decide to refinish a door like this, the key to it is sanding, sanding. The panel corners, moulding are extremely difficult. We really like the Dremel tool detail sander. It made it so much easier to get to those difficult spots in a timely fashion without KILLING our fingers.
Sunday, October 27, 2013
Insulation in Kneewalls
Kneewalls are a challenging part of a home because they are a little bit hard to build and insulate. We chose kneewalls because of the expanded space and better, though challenging, insulation.
Here is a drawing from Shelter Kit showing the kneewall extension. So rather than having the rafters meet the floor joists directly, there is a extension of the wall that supports the rafters. This gives you more usable space.
The next drawing shows the increase in space in the upstairs with kneewalls.
The difficulty arises with the funky cavities made by these kneewalls. How do you insulate this space?

Here is a drawing from Shelter Kit showing the kneewall extension. So rather than having the rafters meet the floor joists directly, there is a extension of the wall that supports the rafters. This gives you more usable space.
 |
| Shelter Kit - Drawing of Kneewall |
 |
| Comparison of space with and without kneewalls |

 |
| Dormer framing with wall framing behind it |
I posted a question on Green Building Advisor about it because I just didn't think the insulation company would be able to blow-in cellulose effectively in these spots. I decided to fill them with Roxul mineral wool insulation and then I'll cover that with the Intello Plus smart vapor barrier. Then we will insulate with the cellulose over that. Does that seem like a lot of insulation for this area? Well, it is, but this is what I call "a vulnerable area" a seam between sections of the house (the roof, the wall and the rim joist below) that is very prone to air leakage.
Also the details of adding exterior insulation to this short section of wall would have been very challenging. So we omitted it from this section of wall. And we built this wall before I started going crazy about air sealing so the inside of this cavity is not air-sealed as almost every other cavity in the house is. The outside is taped though.
Now you can see my efforts at insulating the kneewalls. This might not meet Grade 1 insulation standard, but the voids are filled. Remember that there will be at least 5 inches of cellulose interior to this insulation to make sure the wall is well insulated.
 |
| Intello Plus membrane will be stapled between the Roxul mineral wool insulation and the dormer wall framing in front. That space will be filled with dense-packed cellulose. |
 |
| Bedroom kneewall stuffed with Roxul mineral wool insulation. |
Saturday, October 26, 2013
Refinishing the Mahogany Door - Sanding Done
John finished sanding the door today. Here is putting the finishing touches on the door.

This is the panel that I sanded.

The stained door. The stain is uneven partly because the grain is different on each panel. Not much you can do about that. It is still going to be beautiful. The bottom panels are not purple. That's just my iPhone photography that makes it look purple.


This is the panel that I sanded.

The stained door. The stain is uneven partly because the grain is different on each panel. Not much you can do about that. It is still going to be beautiful. The bottom panels are not purple. That's just my iPhone photography that makes it look purple.

Friday, October 25, 2013
Refinishing the Mahogany Door
The third purchase that I've made from Craigslist is this mahogany door with sidelight. We saw it advertised and John loved it so we bought it. I didn't negotiate as I should have because I just didn't know. The front of the door was seriously damaged from the sun (which was not shown in the pictures online and the seller even loaded the door with the bad side down so we didn't see it until we got home. Dumb, I know). I did not take a picture of it, but it almost looked burned because of how cracked the finish was.
So that, of course, means that we have to refinish the door. Well, mostly John has to refinish the door. He was able to refinish the sidelights and the door frame a couple of weeks ago so Carlton and Myron could finish the putting up the Hardieboard siding. John is not completely satisfied with the job he did, but I think it looks great. I'll try to add a photo tomorrow.
Anyway, now we are down to finishing the door. You can see that it is pretty complicated with raised panels, moulding and curves. John has taped the glass in the center to protect it from his protracted efforts to get the old finish off the door.

Here is a photo of one of the panels that is almost completely sanded. You can see where the stain and old finish hide in the corners.

After John applied stripper, then he went after the stain and residual finish with the following tools: wire brush, tiny pieces of sandpaper, his knife, Rockwell oscillating tool, sanding sponges, and a Dremel tool with a detail abrasive brush.

All of them have been useful, but the winner is:

The Dremel with a detail abrasive brush. The picture shows one that has been seriously worn down. They aren't cheap, but this gets into the corners better than anything else we have found.
I think the door will be beautiful. Also, it will be in a much more protected location at John's house. It's located at the entrance to the enclosed porch on the shady side of the house.

You can see a little bit of the sidelights and door frame on the porch. The light colored paint at each corner of the window trim is primer. We're still working on colors.
I'll try to post again this weekend as I'm only working for brief period on Sunday.
Thursday, October 17, 2013
Still Life with Caulk Gun

It's a cool, rainy day and the guys are not working today. I am off today so I am doing what I do best - air sealing all by myself in the quiet little house. My caulker's elbow is not getting worse, my thumbs are sore, but not intolerable. And the shooting pain I get in the left thumb I can avoid if the squeeze the handle properly. So it's going good.
I need to get this done so we can insulate the shell and get on with construction of interior walls, stairs, as well as bring in power and water supplies (in other words, finish the house). We do have a few penetrations of the walls that have to be dealt with:
Exterior power - 3 outlets, one for each porch
Exterior lights - 3 lights, one for each porch
Dryer vent
Exhaust fans - 2 bathrooms, 1 kitchen
Carlton cut the holes for the HRV (heat recovery ventilator) in the walls. They have not been installed or sealed up yet. We are using a really cool HRV called Lunos e2 (that's e-squared, I think) from 475 High Performance Building Supply in Brooklyn, NY. I plan on talking about that in another post.
The plan is for the HVAC, power supply and water to come in from the floor. They will be air-sealed at that floor penetration.
We are debating about where to put the woodstove because it would require a HUGE hole in the roof that cannot be insulated even with mineral wool. Crazy. We may put it on the front porch.
Wednesday, October 9, 2013
Cozy Mineral Wool Sweater on the House
John's house has a number of uncommon features that are designed to make the house more efficient and more resilient, better able to withstand weather and time. I'd like to talk about a couple of those details, the mineral wool exterior insulation today and the function of the rainscreen in another post.


Here is our cozy Mineral Wool Sweater before the addition of the rainscreen.

The most time-consuming of these two features is the exterior insulation and all that installation details that entails. So we (I say we, but it is, of course, Carlton and his crew that have done this) covered the entire house with a cozy mineral wool sweater, so to speak. This 2 inch thick sweater of insulation (total R value of 8) provides an uninterrupted layer over the house that is insect, fire, water resistant and helps maintain the desired interior temperature with much lower energy use. It reduces thermal bridging - the transmission of heat through the parts of the building that are more conductive such as the wood studs and beams. Remember the R-value (defined as resistance to heat flow) for wood is about 1 per inch whereas most insulation ranges from 3 to 6.
This is a drawing of a thermal scan showing where the heat loss occurs in a normal stud framed house. You can see that more intense heat loss occurs through the windows but a significant amount happens through heat flow across the wood studs. In the average home built with 2' x 4' or 2' x 6' framing, approximately 25% of the exterior is wood which means LOTs of thermal bridging.

Here is an actual thermal image showing the interior of a house where you can clearly see the wood studs and bracing in the wall. The deep purple is probably due to air leaks through the intersection of the studs in the corner.
 |
| From Erik North's Energy Auditing Blog |
When I re-sided my house about 3- 4 years ago , I covered the entire house with Polyisocyanurate foam sheets (polyiso for short) to reduce the thermal bridging. I chose polyiso because it has the highest R-value for common insulation materials and was relatively easy to install. Also that was early in my studies on energy efficient design. Disadvantages of polyiso are that it is made from oil, somewhat flammable, insects love to nest in it, and it has "global warming potential" from the blowing agents used in the making of the foam. So at that early stage in my studies, that's what I chose.
After realizing that there are many other options out there, we chose Roxul Rockboard 80 for John's house. It's much more of a pain to work with because it itches (some people aren't bothered by it, but I try not to touch it without gloves on) and the sheets come as 2' x 4' rather than 4' x 8' for foam sheets. Truthfully, I did not calculate the cost difference because I was set on Roxul and was not going to consider foam. I feel that this is the proper choice for John's house based on fire, insect, and water resistance.
Later in the construction process, we will do an energy audit so we can see how effective the cozy mineral wool sweater actually is.
Sunday, September 22, 2013
Back to Reality - Homebuilding, Work
This week has been a serious back to reality week. I was exhausted after coming back from Oregon last week. I slept like crazy. Going to bed early and everything. I had wonderful days at work, busy, but not overwhelming. I have to take my Pediatric Emergency Medicine recertification boards this week. Pretty scary. I studied some, even in Oregon, but you can't study enough to feel comfortable. I am pretty anxious about that. And then there is the house which is going really well. That's mostly what this post is about.
You may recall the we are using an exterior insulation called Roxul. I looked for Roxul Comfortboard but was unable to find it easily. I could have gotten it from one of the big box home improvement stores but it would take 6 weeks or so to get it in. I did find Roxul Rockboard online from ATS acoustics, an acoustic supply house. Their lead time was about a week. I posted online at Green Building Advisor (my favorite website) to see if Roxul Rockboard and Roxul Comfortboard were equivalent and Albert Rooks of Small Planet Workshop (where I am getting a lot of my air sealing supplies) said that they were. The compression resistance of both products is 743 psi so the products were very similar. I ordered from ATS despite very high shipping costs, but we were able to get the product in one week.
Carlton and Chris and Myron have been installing this material on top of the very well air-sealed exterior for the past week when I was gone.
Front view of the house with the installed 2 inches of Roxul. Foam was used around the windows so we could make sure that we airsealed well around the windows. The rainscreen which goes on before the siding has not been applied to this area of the house.

You can see the rainscreen has been applied to the back side of the house. The fixed transom window is above the stairway. I know it looks a little funny, but it is about all that would fit there. We were going to put a window in the bathroom, but decided against it because that can cause all sorts of problems with mold and rot. Since we are trying to build a highly efficient, long-lasting, resilient home, it does not make sense to put a window in the bath/shower area to catch water and cause rot in the wall. So it looks a little strange, but it is on the back of the house. To bring light into the bathroom, we will install a sun tunnel on the roof of the dormer.

Driveway, gable end side of the house. Again, the rainscreen has not yet been installed on this side. You can think of exterior insulation like a sweater for your house. There are essentially no thermal bridges on the outside of the house to conduct heat in or out of the house. So the insulation inside can do a much better job maintaining the desired temperature. The comfort level of the house is going to be amazing, I think.

Well, that's where we are this weekend. Next week Carlton and Myron will work on the soffits and more rainscreen on the gable ends. Then I don't know what is next. I have to figure out penetrations though the wall. Most electrical and plumbing should be through the floor (which brings its own set of problems), but there are still some things that will have to go through the wall. I need to make sure that is planned for now.
Carlton's helper, Chris, was switched to the day shift so he is no longer able to help in the mornings before he goes to work. That is kind of sad, because he has been a very good worker and great help to Carlton. We will miss him.
You may recall the we are using an exterior insulation called Roxul. I looked for Roxul Comfortboard but was unable to find it easily. I could have gotten it from one of the big box home improvement stores but it would take 6 weeks or so to get it in. I did find Roxul Rockboard online from ATS acoustics, an acoustic supply house. Their lead time was about a week. I posted online at Green Building Advisor (my favorite website) to see if Roxul Rockboard and Roxul Comfortboard were equivalent and Albert Rooks of Small Planet Workshop (where I am getting a lot of my air sealing supplies) said that they were. The compression resistance of both products is 743 psi so the products were very similar. I ordered from ATS despite very high shipping costs, but we were able to get the product in one week.
Carlton and Chris and Myron have been installing this material on top of the very well air-sealed exterior for the past week when I was gone.

You can see the rainscreen has been applied to the back side of the house. The fixed transom window is above the stairway. I know it looks a little funny, but it is about all that would fit there. We were going to put a window in the bathroom, but decided against it because that can cause all sorts of problems with mold and rot. Since we are trying to build a highly efficient, long-lasting, resilient home, it does not make sense to put a window in the bath/shower area to catch water and cause rot in the wall. So it looks a little strange, but it is on the back of the house. To bring light into the bathroom, we will install a sun tunnel on the roof of the dormer.

Driveway, gable end side of the house. Again, the rainscreen has not yet been installed on this side. You can think of exterior insulation like a sweater for your house. There are essentially no thermal bridges on the outside of the house to conduct heat in or out of the house. So the insulation inside can do a much better job maintaining the desired temperature. The comfort level of the house is going to be amazing, I think.
 |
| See what a great job they have done installing Roxul Rockboard 80. |
You can see the rainscreen details a little bit better in this photo. There is a small air gap around the windows to allow any moisture in the siding to evaporate which will significantly prolong the lifespan of the siding, the sheathing below the insulation and even paint on the siding.

Well, that's where we are this weekend. Next week Carlton and Myron will work on the soffits and more rainscreen on the gable ends. Then I don't know what is next. I have to figure out penetrations though the wall. Most electrical and plumbing should be through the floor (which brings its own set of problems), but there are still some things that will have to go through the wall. I need to make sure that is planned for now.
Carlton's helper, Chris, was switched to the day shift so he is no longer able to help in the mornings before he goes to work. That is kind of sad, because he has been a very good worker and great help to Carlton. We will miss him.
Thursday, September 19, 2013
Cycle Oregon Photos - Part 3
We had a rest day in Diamond so I rested. There were all sorts of activities you could do, but since I barely had the energy to walk, I rested. Lynn felt better by that day and was able to come to see me that night.
This is the round barn that we visited as we left Diamond. It was a very beautiful building. Cool inside, too.

Entrance to the round barn

Framing of the round barn

Leaving Diamond, Oregon early in the morning.

Delightful, overcast day

One of the highlights of the trip was seeing Xena, the superstar of the Cycle Oregon Tour. She was pulled by her owner who was a petite young lady. The trailer weighed 22 pounds and Xena weighs about 60 pounds. Xena is an exceptional dog.


I did not take any photos on the last day. It was 73 miles, again a new record for me in the last 10 years. Now the challenge is to keep it up.
Cycle Oregon Photos - Part 2
This is the tent city on the second day in Burns, Oregon. Packing up for the 3rd day of riding

The llama helped carry our bags to the truck for the next town we finished in.

Llama doing its job.
Hot and dry, getting ready to go downhill

See the delightful downhill ahead.

Riding from Burns to Diamond, Oregon. Must check messages on the phone. Oh, I forgot there is no service out here. Well, it is still a good time to take off my shoes and socks and rub my feet.


Riding to Diamond, HOT!

There is the tent city finally, see the little white blobs. Those are tents and shower trucks - my oasis.

Wednesday, September 18, 2013
Cycle Oregon Photos - Part 1
I didn't really take a lot of photos because it was a very difficult week of riding for me, but here are some photos to give you a taste of what Cycle Oregon is all about. This year the ride was in Eastern Oregon which is mostly desert, certainly much drier than most people associate with Oregon.
Bus ride to John Day, Oregon from Portland

Highway went along the Columbia River from Portland to Pendleton, a rodeo town. We then went south to the town of John Day.


Using every excuse to stop climbing and stretch my neck and arms


I decided to break up the photos over 2-3 posts so your pages will load easier. I rode 70 miles on this day which was my longest ride in 10 years.
Bus ride to John Day, Oregon from Portland

Highway went along the Columbia River from Portland to Pendleton, a rodeo town. We then went south to the town of John Day.

Tent city in John Day, Oregon

Our tents were pitched on the local baseball field. The grass was very nice and soft.

First morning's ride was supposed to be 70+ miles. I didn't think I could do 2 days of 70+ miles in a row so I rode 13 miles to the first water stop and then back to the same campsite for a total of 26 miles. We stayed in John Day for 2 nights in a row which was very nice.

Second day climbing

Using every excuse to stop climbing and stretch my neck and arms

I was not the only one who used every excuse to stop.

I decided to break up the photos over 2-3 posts so your pages will load easier. I rode 70 miles on this day which was my longest ride in 10 years.
Subscribe to:
Posts (Atom)