Showing posts with label Air Sealing. Show all posts

Sunday, June 7, 2015

Attic Insulation - May Energy Report - Proof that it WORKS

I could't get my scanner to scan so I had to make do with an iPhone photo. 

In March and April I spent many hours in my attic air sealing and insulating hoping that getting the insulation to an R-20 level would make a difference. I have plans for putting in 10-12 inches of blown-in cellulose in the fall after I do some more work up there such as beef up the rafter supports for one thing as my roof is only held onto the house by a few nails toenailed to the rafters.

I elected to use denim because I was SO tired of itching from all the mineral wool insulation which I love, but I do not love the itch that comes with it. Denim is a dream in terms of installation compared to mineral wool. Still mineral wool, specifically Roxul (Carlton, my carpenter, calls it Roxie), is my all time favorite insulation. Just remember that even when I talk fondly about denim as an insulation material.

Anyway, I got my May energy report from Duke Energy and I used about 15 KWH per day for a total of 428. Though on my energy report it shows only 368 for the month. They must have used a different interval for their report.


I have saved all my energy bills for more than 10 years, but I can't find the complete collection for a better analysis. I do have some from this year and last though for comparison. My sister and her husband lived with me from December 2013 to October 2014. Also my younger brother lived in my basement while we were building his house from sometime in 2013 to September 2014. You can see the drop in consumption in November with only one occupant, but I was above the green energy efficient home during the winter, probably from heat loss through my attic until I started insulating the attic in March.

So I have graphic proof that just getting my attic to R-20 has made a big difference in energy use. I will tell you that the house is so much more comfortable.

One of these days I hope to show a chart of energy use correlated with the work I've done on the house - metal roof, 2 inches of polyiso under the HardieBoard siding, new windows, attic insulation, etc, but that will take some research.


Thursday, March 26, 2015

Giant Holes in the Attic - Air Sealing again


Sun Tunnel in attic
Kitchen fan vent in the attic
Fiberglass around the kitchen fan vent - the black discoloration is years of dust going through the fiberglass where it functions as a filter.
Almost every day I work in the attic trying to get a basic level of insulation in place before it gets too hot to work up there - probably within the next 3 weeks.

I am installing 5.5 inches of UltraTouch denim insulation on top of seriously compressed fiberglass batts squashed down to one inch. The UltraTouch is supposed to be R-21, but that may be overestimating a little. I figure what I'm doing will get me to at least R-20 in the 5.5 inch ceiling joists. I think that just this small amount will make a tremendous difference for the summer. But for my area the code requirement is R-38. I'll get way beyond code when I install 10+ inches of cellulose later in the year.

Anyway, to ensure that the insulation can do it's job and not just function as a filter (see fiberglass photo above), you've got to do the hard work and air seal what you can get to. My Sun Tunnel is way out at the edge of joists between rafters, I cannot physically get there. I am going to put an extension tube on a can of spray foam and squirt the hell out of what I can reach.

I was able to air seal around the kitchen vent fairly easily. I used foam board and Prosoco Joint and Seam Sealer. I was a little over exuberant in using the seam sealer as usual, but it is sealed.


The weather is finally like springtime here. We might get frost this weekend, but things are blooming and it is really lovely. I hope you are enjoying some springlike weather.

Wednesday, March 11, 2015

Adventures in Air Sealing and Insulation

So I finished a tiny part of the insulation in the gable over my entrance porch. It is hard to convey how difficult it is to crawl into that area.

Here is a photo showing the path to that gable end.


I haven't used a measuring tape to see what the distance is from the plywood covering the joists to the ridge beam, but I've measured it with my body. It is shorter than my torso. That's my foot to give you perspective. I actually think I have splinter in my scalp from this adventure.


This is the porch area caulked for air sealing. I used some fire-rated caulk because that is what I had on hand. That's why it's red.


My favorite caulking gun is show below. It's the Siga Primur Applicator Gun for tubular bags.
It's what I used most of the time at John's house. I use it with Prosoco Joint and Seam sealer, another product I also love for air sealing.


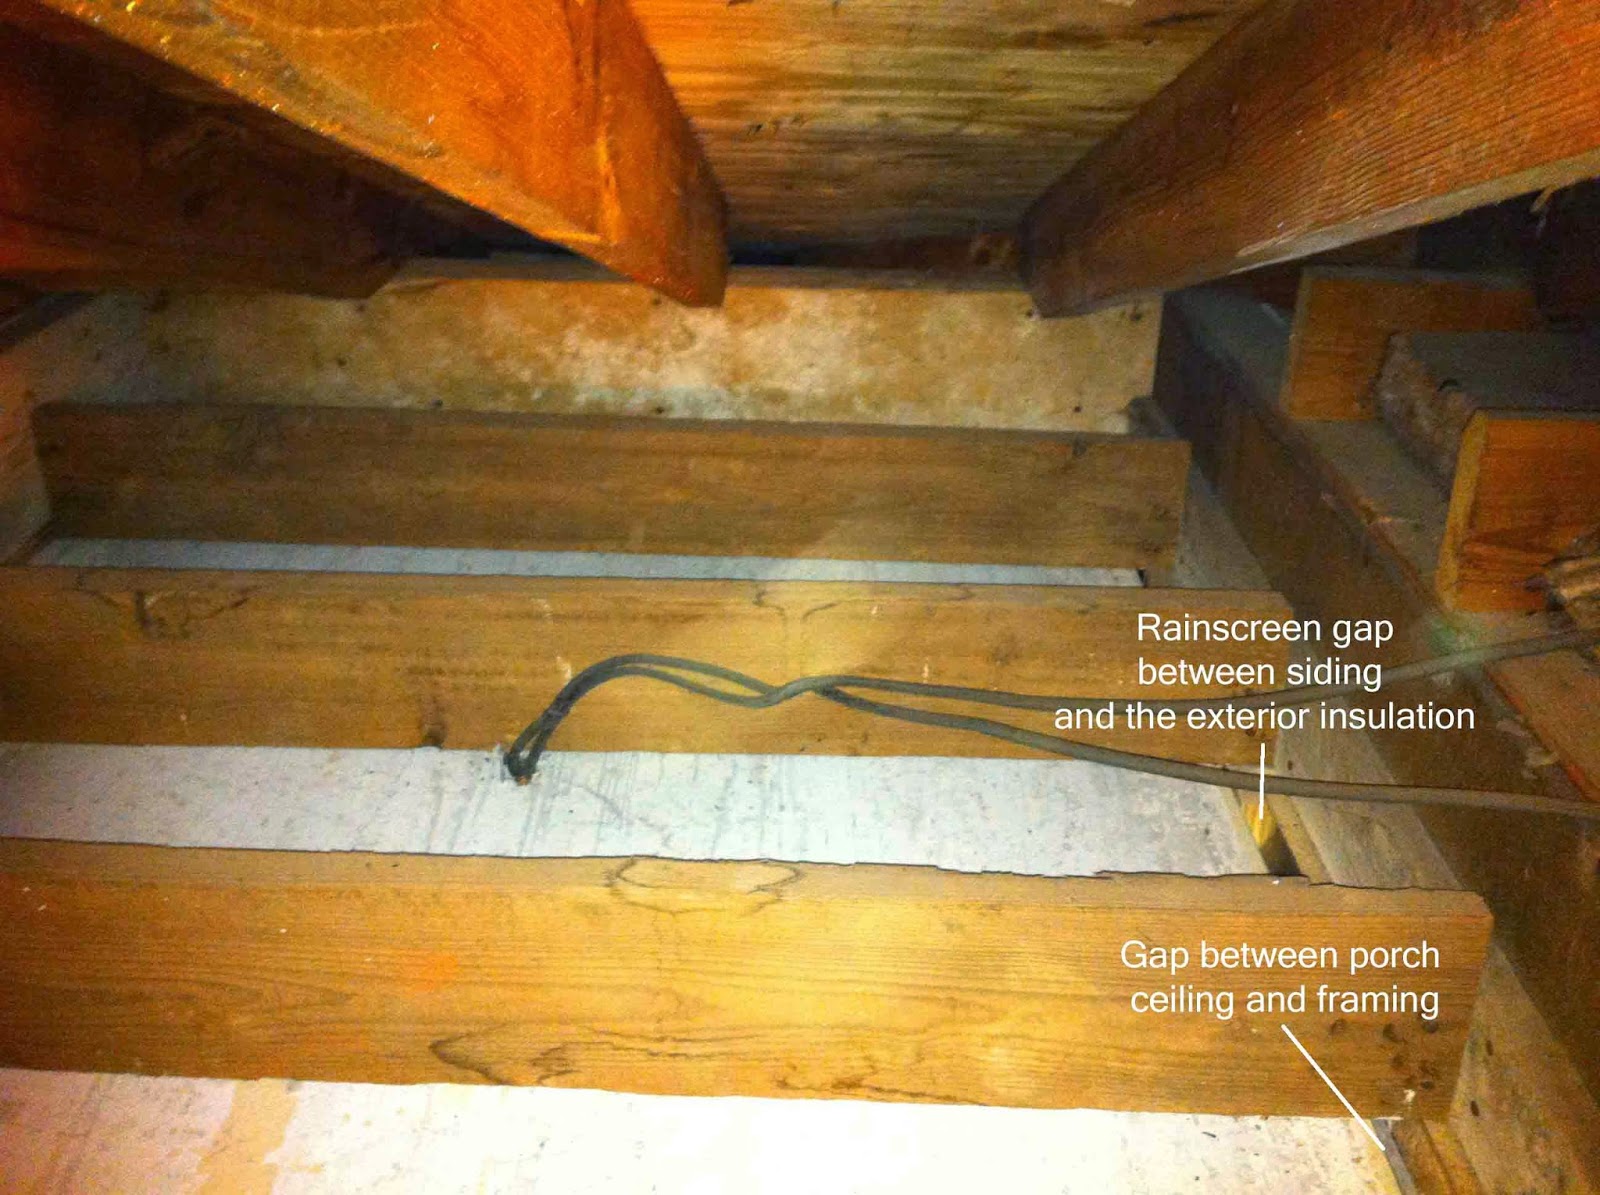
My tools for sealing the rainscreen gap. You really aren't supposed to seal the rainscreen gap. The idea is that with this gap behind the siding, it can dry out easily, be less prone to causing rot, and paint will adhere better. But this area was not detailed correctly (I really don't think any of it was detailed correctly) because it goes directly into an area that should be insulated. It should either have a gap at the top of the siding or go above the insulation. So I decided to close off this area. There are gaps between the siding anyway so I think it can dry effectively anyway. 


Same area after small pieces of foam were caulked in place.


Whew! The insulated porch ceiling is shown below. About 11 inches of UltraTouch Denim Insulation for an R-value of ~38. Hey, I met code there. 

This was a painful task. The other side of the gable is a little easier because it doesn't step down like the ceiling on the porch does, but it is almost as challenging. I don't think there are any gaps I have to air seal though. I'll have to explore and make sure. 

That was quite enough of an adventure for one day. My neck, elbows (from the army crawl), abs are recovering. I hope to finish the other side of the gable tomorrow.

Friday, March 6, 2015

Why Insulating is hard - if you do a good job, that is.

Today I am not loving my insulation project so much. Today the job is very difficult. Today I don't like my insulation very much at all, but what I did today, had to be done.

First here are some photos of the current state of insulation in my attic. Not very effective insulation. The paper "vapor barrier" has seriously deteriorated. The second photo shows the insulation near my chimney. I dread insulating around that because you have to install a fire barrier before you can put insulation outside of the fire barrier and that's despite the face that I don't use my fireplaces. What you cannot tell from these photos is that the tallest point is about 4 ft. It is extremely difficult crawling around in there.

Older fiberglass insulation from the 50s


Ok, so here is the worst place to insulate. It is over my outdoor front porch and there are obvious air leaks and no insulation. In addition, the attic ceiling height might be 2 feet at best. You will be bonking your head on the rafters.


This view is looking straight down at those gaps. I'm going to put a small piece of foam board there to seal that area.


Remember the most important principle in applying effective insulation is air sealing before insulation. Otherwise your insulation just functions as an air filter.

So I caulked all around in this area of my front porch ceiling today. No after photos because I was so covered in caulk that I could not pull out my iPhone to take a picture.

Also, here's helpful hint. Caulk the area that is away from you first so you don't have to crawl through the just applied caulk to get to the distant area. You will be much happier if you do that.

Tuesday, March 3, 2015

Insulation - My Favorite Thing

You know I love insulation, even more than air sealing. I even dream about insulation, mostly because my home is cold and I dream about being warm and snug in my own home. That problem will be improved on very shortly.

Anyway back to the insulation at hand, several years ago I bought a little house that we've partly renovated that Kathy lives in. In fact when I started this blog, the first stuff I wrote about was what we were doing at that house. There is a very solid, little concrete block building in the backyard (about 12' x 25' interior dimensions) that has been mostly used to store things. Since the home is so small at about 900 square feet, we decided to renovate this building to make it livable and give Kathy and her son just a little more breathing room.

Carlton has done most of the work. First, he studied the building carefully and felt confident that there weren't any water issues and that the block walls and roof framing were solid. Then he installed some windows to bring light into the space. Then framed the floor and installed 2 doors - one so you can go into the building from the driveway without having to open the gate to the fence. We may build a garage someday, so this door would open into the garage. Finally, Carlton installed a layer of foam insulation board on the interior of the walls, then framed the walls and insulated them with 3.5" mineral wool and installed drywall. That's where he stopped, now it's my turn.

Carlton was able to insulate a large portion of the ceiling with the Roxul mineral wool left over from John's house, but he ran out before he could insulate it all. I told him, "No worries, I'll finish it up." If you recall from last summer I spent HOURS and HOURS under John's house air sealing and insulating the floor of his house. It is tedious doing this work overhead. I also got tired of the itchy, scratchy sensation from the Roxul. It is supposed to be less obnoxious that fiberglass, but I wouldn't know as I've never installed fiberglass insulation before. In any case, I did not feel like suiting up to avoid the itching. So I ordered from Soundproof Cow once again and got some denim insulation.

My plan was to use these flexible metal tension rods to hold the 2 layers of 3" denim insulation in the 24" on center ceiling bays.


Don't do it. Don't buy those things. They will flop down and hit you in the head and they won't hold anything. You can see the scratches on the rafter on your right where they kept falling down on me. I had to come up with a new method to hold up the insulation.

The solution? An insulation corset.


I didn't want to use staples because it's hard for one person to hold the insulation up, pull the string tight and staple all at the same time. Also I don't have John's pneumatic staple gun set-up and regular staplers hurt my hands. (Youngsters, you will be amazed at what hurts you when you get just a little older - say, in your 50s.) So I hammered in some roofing nails because they have big heads on them and would hold the masonry string well. I chose masonry string because I figured it would pull taut and hold pretty well. I think it looks pretty good. Above shows the first layer of the 3 inch deep insulation.


And here is the full bay of insulation. I'm pretty happy with it. I will probably cover the seam between the Roxul insulation and the denim insulation with a band of the Roxul Rockboard that is left over from  John's house.

Denim insulation is a challenge to cut. It will not cut with a utility knife. Often people just end up tearing it which works pretty well though you won't get a good edge. I kind of do a sawing, tearing motion with a drywall saw.

Below you can see what the edge looks like.


So that was my insulation adventure today. I have 5 more 24" bays to insulate and 8 narrower bays. Tomorrow some more insulation will arrive. It is planned for my house, but I will use a few bales of it on this building.

I have not yet expanded on the topic of how much insulation should you use beyond the code requirements. That is coming as well.

Thank you for taking a look at my blog. I hope you are warm and comfortable.

Thursday, February 12, 2015

Leaky Walls - Infrared Photos on vacation in Montana

I just purchased a small infrared camera that attaches to your iPhone. It's called the Flir One. It's a little awkward to use because of the way it's attached to the phone (you have to take your phone out of whatever case it's in and insert it in the Flir One case which is a tight fit).

I used it a little bit when we went on vacation.

Here are a few photos.

The first one is from our hotel room in Bozeman, I believe. Obviously the dark colors are colder and the lighter colors represent warmth. You can see the leakage at the corner, you can see where the individual studs are in the wall. I wonder if they are metal studs because heat is conducted so much more effectively through metal. But the striking thing is the serious cold air at the intersection of the floor and the wall.


The second photo is from Big Sky, I think. Same problem, serious air leakage, cold air infiltration at the corner of the room where the walls intersect the floor. 


This view shows a seriously under-insulated corner stud.


I need to go over my house and take some photos. I have not done so yet because the daytime temperatures outside have been so close to my inside temps that it wouldn't show where the heat is leaking out and the cold is coming in.

Thursday, August 14, 2014

Blower Door - Slight Disappointment

Ok, we had what was supposed to be the second and LAST blower door test, but I am not happy with the result and I may have Dean Benton of Benton Green Energy come again after I have fixed some problems. 

Blower door reading on August 6, 2014

You may recall that a blower door test helps determine how much air leakage you have through the building envelope. The test involves putting a fan in an outside door frame and depressurizing the home to accentuate the air leaks. The house is depressurized to a level of 50 pascals which is about equivalent to the force of a 20 mph wind on the home. There are 2 main values that you get from the test - one is directly from the manometer as shown above and one is calculated based on the volume of the house. This article, Blower Door Basics by Martin Holladay on Green Building Advisor (GBA) explains it much better than I ever could.

Blower Door Set-up while we were at the rough-in stage. 

The number shown on the manometer above is called cfm50 or the amount of air that moves through the home at 50 pascals of pressure. The other number is ach50 or air changes per hour at 50 pascals.

Our previous reading was 98 cfm 50. The above reading is 235, but I think it leveled out at 220. In any case, the number has more than doubled - 2.4 times greater than the last blower door.

What happened??

Well, I have some ideas.

What do you think about this dryer vent? Do you think that there is some leakage around this pipe?

Dryer vent through the wall, not sealed around the vent pipe. This was installed AFTER the first blower door test.

What about the vent cover for the kitchen fan? Do you think that those little plastic louvers seal out air?

This flimsy plastic piece covers one of the fan vents. A similar cover was on the dryer vent. 
Now the photo below may show a less important air leak. This is the inside view of the Lunos e2 - a heat recovery ventilator (HRV) that exchanges outside air for inside air. It does go through the wall in large tube. We did seal the tube to the sheathing inside and out before the walls were closed in. Still it is designed to move air through the home. You may wonder why we go through all the trouble to seal up every possible hole in the building envelope and then deliberately install a fan to exchange air. Well, when you have a very well air sealed home, you need to move more fresh air through for the inhabitants, but it needs to be filtered, conditioned air, not random leaks. That's what the HRV provides.

Lunos e2 Heat Recovery Ventilator (HRV)
The reason I did not calculate the ach50 is because I am confused about the volume of the house. The house is a Cape Cod design with kneewalls and sloped ceiling upstairs so I don't really know what counts as the house or not.

For example, the space above the bathroom and the bedrooms is not really sealed off from the rest of the house. It is within the thermal envelope of the building. Do I count that? I think so, but I am not sure. I am going to post a questions on Green Building Advisor to get their advice.

Area above the bathroom. You can see the Intello Plus smart vapor retarder from 475 High Performance Building Supply. The ceiling joists are insulated with dense pack cellulose. There will be a small door that fits in the opening. It does not set tightly to the frame, however. Is this within the thermal envelope?

So, the big change from the rough-in stage to almost completion (I know, almost completed at 18 mos later - crazy ) is the vents. We taped cardboard over the area where the vents were during the first test, but I don't know if you tape over vent covers when you go for the final test. That's another question for the knowledgable people at GBA.

I'll let you know more later. Thank you for visiting here. 

Saturday, July 26, 2014

You May Ask Yourself - Where are they with their beautiful house?

Ok, so it's July 26th and this is the first post of the month so you may ask yourself - are they really working on the house? Yes, yes, always yes.  We always work on the perpetual house.

Here are a few views of where we are now.

This is the enclosed porch with floor stained. You can see the stone pad for the Jotul stove in the background. We put it on the enclosed porch so we could isolate any air leaks from the stove from the main part of the house. There are 2 windows and a door connecting the house with this porch so we can easily open the porch to the main part of the house should that be needed to heat the house.


This is the opposite end of the enclosed porch with the front door and now the floor has one coat of Waterlox finish on it.


Guard dog at the plumbing supply warehouse. We bought a really beautiful Toto Promenade toilet from the people here. We were very quiet while we waited for our toilet delivery so we wouldn't get the dog riled up. I'll try to get some photos of the toilet later this week.


This is the hanging light over the stairway. We waited quite awhile for it to be installed. The colors on the wall are somewhat distorted. These hallway walls are painted with a color called Aqua Pura - a light clean blue, sometimes looks white when the sun is shining on it. John hates it, but the True Turquoise used most other places in the house is too dark. He can paint over it if he wants to take the time to do so (but he won't).


And what have been doing for the last month or so? Taping, foaming, taping. Here are few photos so you'll have a better idea of my current projects. This is a cropped view of my foam face. I was foaming around the ducts underneath the house and got splatted with foam. I kind of had to sand it off my face before I went to work the next day.


Protective gear to prevent "foam hair" which is a real problem to deal with.
And here is unfinished my masterpiece - the Pro Clima membrane under the house taped to the enclosed duct work. This is the best view of the membrane. It's somewhat difficult to take a good photo that illustrates how involved it is to seal under a house. This topic absolutely deserves a lengthy post of its own.


There is still a lot of work to do under the house. That's why it's my unfinished masterpiece. I will keep you informed. 

Thanks for reading this blog on the perpetual house. Hope to be finished with this project very soon.

Monday, May 26, 2014

Duct insulation in the Crawlspace

If you are involved with building a house, you will encounter challenges that you never thought could exist. You will think to yourself, "How can this be so difficult?" And when you try to figure out how to insulate a crawlspace and the ducts that run through it, you will be especially challenged. 

Remember one of the highest priorities in building John's house is to make it energy efficient. That means you try to minimize the energy losses from the home's shell, the thermal envelope. And that includes every side of the house including the dreaded crawlspace. Now we made the crawlspace a little less disgusting (dark and dank and spidery) because we did not enclose it. The house's foundation is on piers. So the space is open to the outside. I designed it that way because the house is very near a pond and a large creek and there is potential for flooding.  We had a torrential rainstorm 2-3 years ago that flooded most of the yard, it did not come to the area where the house is located. Still I thought it was prudent to build on piers to eliminate that potential problem.

We have insulated most of the joist bays in the crawlspace, but now we have insulate around the ducts. The ducts are already wrapped with what is listed as R-8 fiberglass though I don't believe it is truly R-8. If you google R-8 HVAC duct wrap you will see various products that are used to wrap ducts. These products are generally 2 inches thick and have foil-faced layer that is taped around the ducts. In order for the insulation to truly have that R-value (resistance to heat transfer) it cannot be compressed. It must be 2 inches thick, but you really can't wrap and tape it around the ducts and preserve that 2 inch space. It is usually compressed to about 1 inch which gives you at best an R-value of 4. I think that is much more realistic. 

You can see where I reinforced the taping on the duct insulation and how it compresses the insulation surrounding the ducts. I've made sure there are NO air leaks in the insulation surrounding the ducts. 

So here's the situation, you've got a house with the roof insulated > R-50, walls insulated > R-30, floors insulated >R-30 and your crawlspace ducts are insulated at R-4? Are you kidding me? That drives me crazy. I just can't see leaving them like that. So we are encapsulating the ducts in 1-2 layers of polyisocyanurate foam boards which will triple the effective R-value surrounding the ducts. It will not likely equal the insulating on the floor, but it will be close to R-20. 

This post aims to show you some of the details of enclosing the ducts. It is tedious work, not as itchy as working with the batt insulation. I hope I can explain these details so that they make sense. 


This photo demonstrates 3 things:

1. The joist bay is air sealed at the edges with Prosoco Joint and Seam filler so air from one bay cannot move from one joist bay to another.
2. The duct is very well air sealed to the subfloor.
3. We have a 2x4 in front of the duct which is to help with placement of the foam board which will enclose the duct. 

Back view of the same duct, now surrounded by polyiso foam boards.
Ok, this is view shows the same duct after we've applied the foam board onto the front. The foam board is glued on with construction adhesive, then foamed around the edges. Also the front of the board is taped to the subfloor and joist bays. So the likelihood of leakage around the foam boards is very low. 


You can see where we have installed some more boards around the duct and the joists. There will be longer boards parallel to the ducts on each side and underneath. Again, all the edges between the boards will be foamed and taped as well as I possibly can manage. This was a slightly more difficult duct because it had to dip down around the rim joist from the main part of the house and back up to the porch. It is the only duct in the enclosed porch which is just 8' x 16'. 

I'm off again tomorrow so I should be finished with this duct then. I hope this is helpful for someone working on their house. Good luck. 

Sunday, May 4, 2014

Extreme Air Sealing - the Crawlspace Edition


Air sealing the duct work to the subfloor. The interior side of the duct work is taped as well. I like redundancy in air sealed layers.
As any regular readers of this blog will know (assuming there are regular readers of this blog outside of my friend, Lynn), I am crazy obsessed with air sealing. After studying how to build an energy efficient home over the past 4 years, this is clearly the most important first step in that direction. Also it happens to be something I can actually do. You don't have to measure or cut precisely, you just have to crawl or climb around to awkward places to squirt foam, goo or tape any and every potential opening in your thermal envelope - the separation between inside and outside. I am capable of doing that.

The last step in air sealing this house is sealing the duct work and connections in the crawlspace. I don't know if John's house technically has what you call a crawlspace because it is built on piers and the space is open to the outside, but it seems like a crawlspace when you have to crawl and duck floor joists for hours at a time.

As I noted in an April post, the HVAC ducts are sealed with some kind of DUCK tape which really doesn't hold well for any length of time - meaning for years of the usefulness of the duct work. I did not take off all the fiberglass insulation and re-tape the ducts with a more long-lasting tape. I just could not make myself do that, but I did reinforce EVERY SINGLE JOINT and EVERY SINGLE PIECE of DUCK TAPE with a very adherent and long-lasting tape, mostly Siga Wigluv. I am hoping that the ducts are so well encased that they won't move much and the tape underneath the fiberglass insulation sheets holding the ducts together will last better.

This tape has only been on for a couple of months and is already loosening. You can see here I have reinforced other areas with Siga Wigluv. I did that on every duct.

This is another example:
You can see all the little strips of paper from taping the pipes.

After the sealing is complete, then I will insulate the 9.25" joist bays with 2 layers of Roxul Mineral Wool insulation - 5.5" layer and a 3.5" layer. The ducts themselves will be encased in the leftover polyisocyanurate foam which you see on your left. I haven't figured all those details for insulating around the ducts yet. 

Rich finished the interior painting, John is building bathroom vanities and I am crawling around underneath the house, sneezing like crazy - air sealing which is what I do best. That's where we are today.

Friday, April 18, 2014

Insulation and the Service Cavity

I was going through some photos of construction of the house and realized that I didn't do any posts about the dense pack cellulose and the smart membrane, Intello Plus.

I was a little disappointed at the dense pack cellulose because the insulation contractor didn't do it like I had seen in videos and it didn't seem dense enough. I read that the installed cellulose is supposed to feel like a firm mattress, but ours only felt that way in some spots. I actually cut holes in several spots to see how well the cellulose held up and it didn't settle. It wasn't as dense as I would have liked, but I think it is adequate. I hope so in any case.

Here are some examples of the Intello Plus and the dense pack insulation. Also there are some areas around the second floor rim joist insulated with Roxul mineral wool insulation. You can see the 2" x 4" service chase on the walls, room for electrical and plumbing so it does not take up insulation space in the 2" x 6" wall space.


You can see the see the service chase in the kitchen much better here.


Monday, April 14, 2014

Crawlspace Challenges

Ok, it's mid-April. We still do not have the construction loan. I don't know how that is possible, but that's the reality.

So we've been working on the house doing whatever we can do. My current focus is air sealing the penetrations in the crawlspace area. This is my job because I like it and I am physically the most flexible in terms of crawling around under the house. In addition I value air sealing more than anyone else involved in this project.

Sealing drain pipes:

Prosoco Joint and Seam Filler around one of the drains. I love this stuff. 

Sealing around duct work:

Air sealing around duct work isn't easy. It's hard to get into some of these spaces. I will foam the really tight areas.
Sometimes I use the Siga Wigluv and sometimes I use the Pro Clima Tescon Vana tape. I primed the Advantech subfloor with a primer first to make the tapes stick better.

Oops! Forgot this one:
Also need to tape the gap in the insulation barrier as well. 

What kind of tape is this? Looks like duck tape.


I think the tape they used to seal the duct joints and to tape the insulation to the ducts is a form of Duck Tape called HVAC duct sealing tape. Regular DUCK tape is notorius for not adhering well over time. All of my ducts are taped with this stuff. I am hoping that the DUCK brand HVAC duct tape is much more adherent that the other duck tape. I am a little skeptical that this will work to keep my ducts from leaking.

The most reliable product for this application is duct mastic which retains flexibility over time and will adhere for many, many years. The reason it is not used as much is because it is seriously messy. The tapes I've used have been field tested in Europe for years and have found to be reliable.

So my crawlspace dilemma is - cut off all the insulation on the ducts and reseal the joints with either mastic or the european tapes or reinforce the tapes on the the exterior of the insulation and hope for the best.

The truth is that I am tired. I've spend quite a number of hours under the house already and I just don't think I can make myself re-tape all the duct joints. In addition, I have already planned to encase the ducts in polyiso foam boxes to nailed and taped to the underside of floor to further insulate them from exterior temperatures. I think that this second layer of reinforcing insulation will ensure that the conditioned air will get to its intended location in the house.