Tuesday, March 31, 2015

Improving the Thermal Envelope

I can tell that the hours I've spent in my attic have made a difference in the temperature of my house. For example, 2 nights ago the temperature dropped to 28 F. Normally on a night like that with the heat set low (set on 58F - I like to sleep cool under my blankets and comforter) the temperature will drop 10 degrees overnight. This time it only dropped 4 degrees and I haven't finished with my first layer of insulation yet. I've got about 15 joist bays to go.

The photos from my infrared camera also show the difference. This way you can actually SEE the difference.
Infrared photo of my stairway ceiling before air sealing around the sun tunnel. 
Now look at the difference afterwards. I have not put down a layer of insulation in front of the Sun Tunnel yet because I just foamed it. The camera in both photos is not calibrated to the same temperature, but you can still see where the warmth escapes. And you can see that the area around the Sun Tunnel no longer transmits heat.

The center circle is the Sun Tunnel itself which is not insulated at all. It is basically a transparent dome surrounded by a tube of very shiny aluminum to transmit light to dark areas.

This photo shows a soffit in my kitchen before and after insulation.  Again, the camera is not calibrated the same because I don't know how to do that. But you can still see that there is much less heat transfer in this area.


Thursday, March 26, 2015

Giant Holes in the Attic - Air Sealing again


Sun Tunnel in attic
Kitchen fan vent in the attic
Fiberglass around the kitchen fan vent - the black discoloration is years of dust going through the fiberglass where it functions as a filter.
Almost every day I work in the attic trying to get a basic level of insulation in place before it gets too hot to work up there - probably within the next 3 weeks.

I am installing 5.5 inches of UltraTouch denim insulation on top of seriously compressed fiberglass batts squashed down to one inch. The UltraTouch is supposed to be R-21, but that may be overestimating a little. I figure what I'm doing will get me to at least R-20 in the 5.5 inch ceiling joists. I think that just this small amount will make a tremendous difference for the summer. But for my area the code requirement is R-38. I'll get way beyond code when I install 10+ inches of cellulose later in the year.

Anyway, to ensure that the insulation can do it's job and not just function as a filter (see fiberglass photo above), you've got to do the hard work and air seal what you can get to. My Sun Tunnel is way out at the edge of joists between rafters, I cannot physically get there. I am going to put an extension tube on a can of spray foam and squirt the hell out of what I can reach.

I was able to air seal around the kitchen vent fairly easily. I used foam board and Prosoco Joint and Seam Sealer. I was a little over exuberant in using the seam sealer as usual, but it is sealed.


The weather is finally like springtime here. We might get frost this weekend, but things are blooming and it is really lovely. I hope you are enjoying some springlike weather.

Sunday, March 22, 2015

Damn! Carpenter Ants in the Attic

Big ass carpenter ants in the attic. See those giant black ants on the left side where I have not insulated yet.


 Here let's blow it up for you. Now you see them?


Carpenter ants (probably these are black carpenter ants - Camponotus pennsylvanicus) don't eat wood like termites do, but that can be equally destructive because they nest in wood, particularly wet wood. There shouldn't be any way the wood is wet in the attic. I don't see any evidence of that, but I am wondering what the hell are those guys doing in my attic. They may not have a nest within the home, but where there is damp rotting wood. They apparently eat insects. They even farm aphids and eat the sugary material that aphids give off. I think that is why the ant are located at this eave because it's below the a louvered area where insects entered my home. 

Now I have to figure out how I want to get rid of them. Here are the options that seem reasonable to me:
1. Follow the trail of the ants to their nest to kill them there. 
2. Use a bait with a slow-acting poison so they take the poison back to the nest and kill off the rest of the colony.
3. Dust boric acid or diatomaceous earth along the edges of my home to kill them with more "natural" insecticides.
4. Treat the area around my house with an insecticide. 
5. Call a pest control company.

After crawling around an attic for days and days, I'm not going to "follow ants to their nest". I know the most likely places for nests around my house. There is some wood at the base of my house that needs to be disposed of. They often nest in areas like that. And I have a doghouse that is not raised off the ground, I suspect they are nesting under that doghouse. I'll work on those areas first by eliminating the wet wood and treating with boric acid.

If that doesn't work, then I will go with a bait I can buy online that sounds promising and not too environmentally destructive - the Complete Ant Bait Kit from Do Your Own Pest Control.

If that doesn't eliminate my ants in the attic, then I'll treat the area around my house with an insecticide and possibly call a pest control company. I don't like that idea though. I want to try the more benign forms of control first.

For a funny, interesting story on battling carpenter ants in a renovated barn, read Joe Lstiburek's article on the Building Science web page called Leiningen versus the Ant Redux.  He's a major engineering guru in building science who is controversial, funny, and very knowledgeable. You'll enjoy it. 

Friday, March 20, 2015

Tangled Up in Blue - Blue Jean Insulation, that is

Stacks of UltraTouch Denim Insulation from Bonded Logic
I've been working a little bit each day on the insulating my attic before it gets too hot to work up there. If you have been reading my blog, you would know that my absolute favorite insulation is mineral wool insulation, the two main brands are Roxul and Thermafiber. It's made from either melted volcanic rock - basalt, specifically, or from slag, a by-product of making steel so you could imagine it is fire-resistant. It is also relatively dense insulation and reduces transmission of sound. BUT if you are going to spend hours and hours crawling around in the attic with this type insulation, you have to be prepared to ITCH. I just could not face that. I had enough of it last year on John's house.

So I picked denim insulation. The best deal I could find was from Home Depot online. I ordered 2 pallets for 24 bales of UltraTouch insulation. Each bale covers 48 sq ft. It's 5.5 inches thick for an R-value of 21. It took about 2-3 weeks to arrive and was delivered to my home for a charge of $55 which I thought was a bargain. It has been a delight to work with. It's easy to tear and install, doesn't itch at all, but it is very dusty. Despite wearing a mask when I am up there, I still sneeze some blue fibers out afterwards.

Here's the current state of insulation.


You can see that insulating at the far end of the rafters will be a serious pain. I need to install some baffles so the insulation won't get into the soffits. That I dread as well.

To show you the effectiveness of this layer of insulation look at the before and after infrared photos of the ceiling fan in one of the bedrooms.

Before air-sealing and insulation above the ceiling fan
After air-sealing and insulation above the ceiling fan
I think the purple area (the cooler temperature) on the ceiling after the insulation was installed is where a beam crosses the ceiling joists. I thought I stuffed the insulation underneath there, but apparently not. I will go back and get it. That's a significant advantage of having my Flir One infrared camera. It is nice to be able to check of your work.


Wednesday, March 11, 2015

Adventures in Air Sealing and Insulation

So I finished a tiny part of the insulation in the gable over my entrance porch. It is hard to convey how difficult it is to crawl into that area.

Here is a photo showing the path to that gable end.


I haven't used a measuring tape to see what the distance is from the plywood covering the joists to the ridge beam, but I've measured it with my body. It is shorter than my torso. That's my foot to give you perspective. I actually think I have splinter in my scalp from this adventure.


This is the porch area caulked for air sealing. I used some fire-rated caulk because that is what I had on hand. That's why it's red.


My favorite caulking gun is show below. It's the Siga Primur Applicator Gun for tubular bags.
It's what I used most of the time at John's house. I use it with Prosoco Joint and Seam sealer, another product I also love for air sealing.


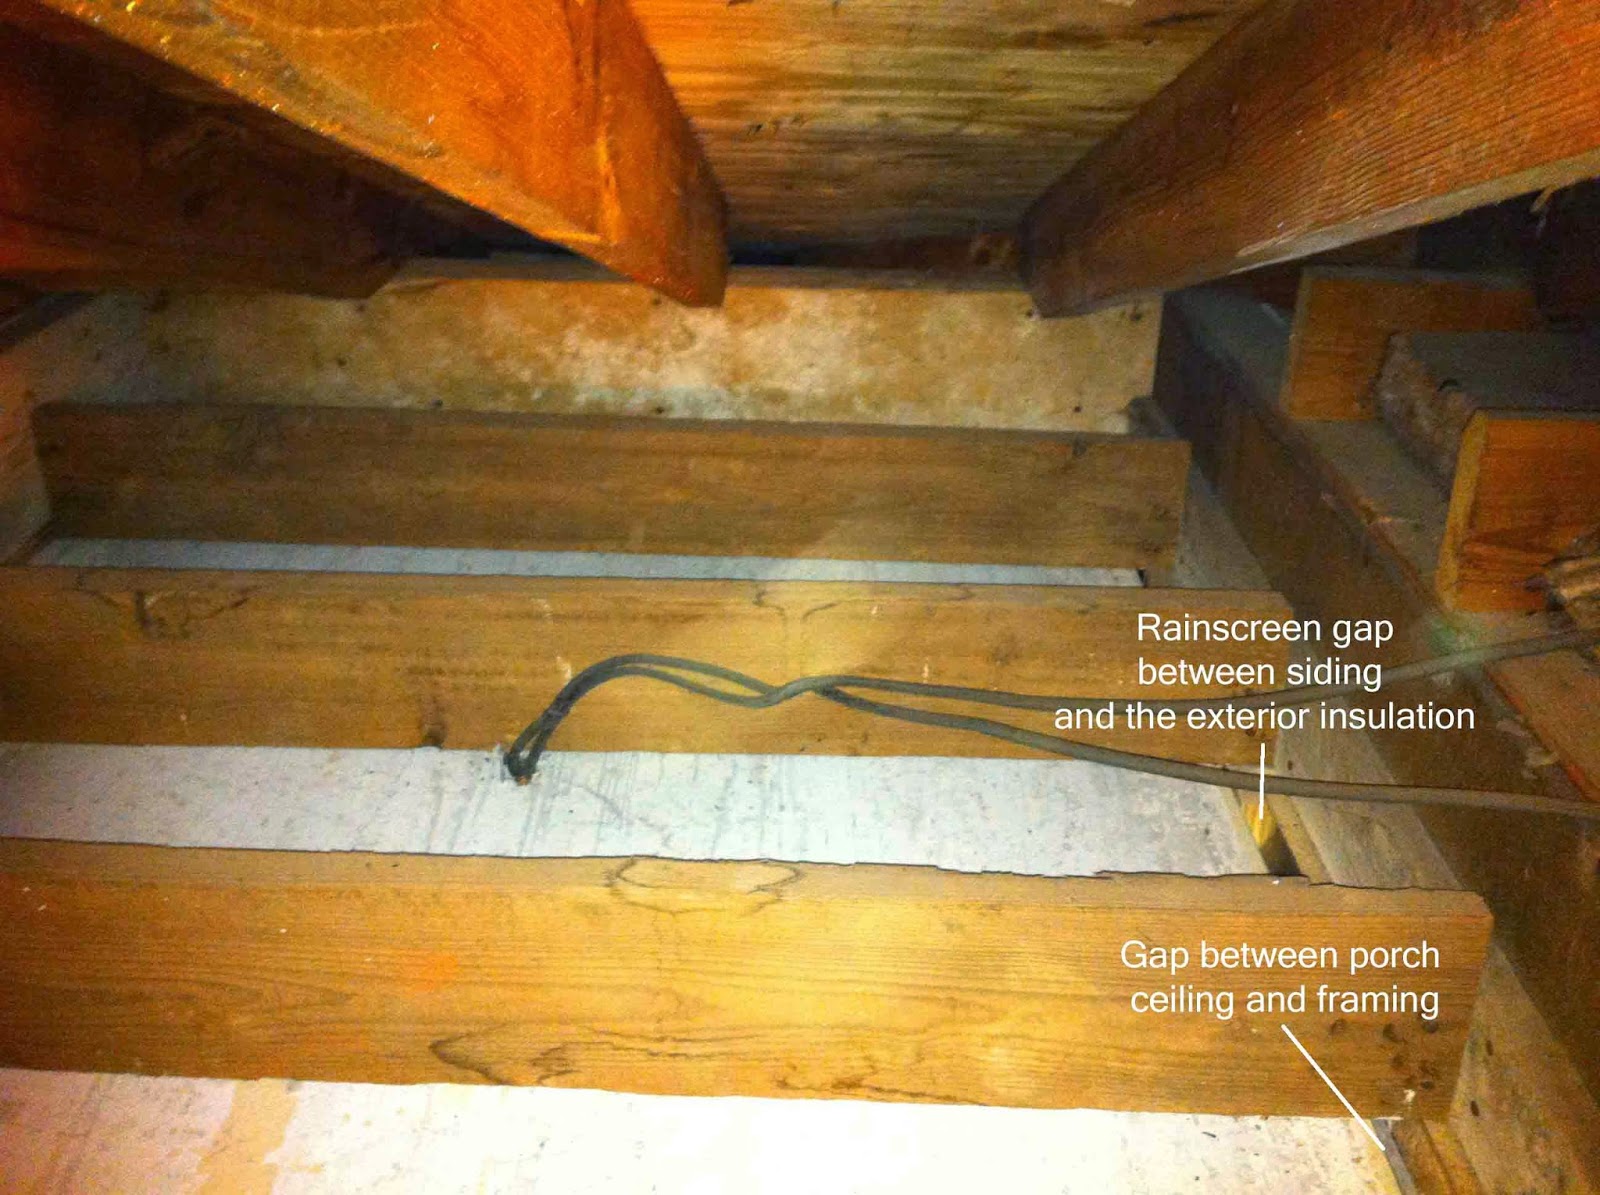
My tools for sealing the rainscreen gap. You really aren't supposed to seal the rainscreen gap. The idea is that with this gap behind the siding, it can dry out easily, be less prone to causing rot, and paint will adhere better. But this area was not detailed correctly (I really don't think any of it was detailed correctly) because it goes directly into an area that should be insulated. It should either have a gap at the top of the siding or go above the insulation. So I decided to close off this area. There are gaps between the siding anyway so I think it can dry effectively anyway. 


Same area after small pieces of foam were caulked in place.


Whew! The insulated porch ceiling is shown below. About 11 inches of UltraTouch Denim Insulation for an R-value of ~38. Hey, I met code there. 

This was a painful task. The other side of the gable is a little easier because it doesn't step down like the ceiling on the porch does, but it is almost as challenging. I don't think there are any gaps I have to air seal though. I'll have to explore and make sure. 

That was quite enough of an adventure for one day. My neck, elbows (from the army crawl), abs are recovering. I hope to finish the other side of the gable tomorrow.

Friday, March 6, 2015

Why Insulating is hard - if you do a good job, that is.

Today I am not loving my insulation project so much. Today the job is very difficult. Today I don't like my insulation very much at all, but what I did today, had to be done.

First here are some photos of the current state of insulation in my attic. Not very effective insulation. The paper "vapor barrier" has seriously deteriorated. The second photo shows the insulation near my chimney. I dread insulating around that because you have to install a fire barrier before you can put insulation outside of the fire barrier and that's despite the face that I don't use my fireplaces. What you cannot tell from these photos is that the tallest point is about 4 ft. It is extremely difficult crawling around in there.

Older fiberglass insulation from the 50s


Ok, so here is the worst place to insulate. It is over my outdoor front porch and there are obvious air leaks and no insulation. In addition, the attic ceiling height might be 2 feet at best. You will be bonking your head on the rafters.


This view is looking straight down at those gaps. I'm going to put a small piece of foam board there to seal that area.


Remember the most important principle in applying effective insulation is air sealing before insulation. Otherwise your insulation just functions as an air filter.

So I caulked all around in this area of my front porch ceiling today. No after photos because I was so covered in caulk that I could not pull out my iPhone to take a picture.

Also, here's helpful hint. Caulk the area that is away from you first so you don't have to crawl through the just applied caulk to get to the distant area. You will be much happier if you do that.

Tuesday, March 3, 2015

Insulation - My Favorite Thing

You know I love insulation, even more than air sealing. I even dream about insulation, mostly because my home is cold and I dream about being warm and snug in my own home. That problem will be improved on very shortly.

Anyway back to the insulation at hand, several years ago I bought a little house that we've partly renovated that Kathy lives in. In fact when I started this blog, the first stuff I wrote about was what we were doing at that house. There is a very solid, little concrete block building in the backyard (about 12' x 25' interior dimensions) that has been mostly used to store things. Since the home is so small at about 900 square feet, we decided to renovate this building to make it livable and give Kathy and her son just a little more breathing room.

Carlton has done most of the work. First, he studied the building carefully and felt confident that there weren't any water issues and that the block walls and roof framing were solid. Then he installed some windows to bring light into the space. Then framed the floor and installed 2 doors - one so you can go into the building from the driveway without having to open the gate to the fence. We may build a garage someday, so this door would open into the garage. Finally, Carlton installed a layer of foam insulation board on the interior of the walls, then framed the walls and insulated them with 3.5" mineral wool and installed drywall. That's where he stopped, now it's my turn.

Carlton was able to insulate a large portion of the ceiling with the Roxul mineral wool left over from John's house, but he ran out before he could insulate it all. I told him, "No worries, I'll finish it up." If you recall from last summer I spent HOURS and HOURS under John's house air sealing and insulating the floor of his house. It is tedious doing this work overhead. I also got tired of the itchy, scratchy sensation from the Roxul. It is supposed to be less obnoxious that fiberglass, but I wouldn't know as I've never installed fiberglass insulation before. In any case, I did not feel like suiting up to avoid the itching. So I ordered from Soundproof Cow once again and got some denim insulation.

My plan was to use these flexible metal tension rods to hold the 2 layers of 3" denim insulation in the 24" on center ceiling bays.


Don't do it. Don't buy those things. They will flop down and hit you in the head and they won't hold anything. You can see the scratches on the rafter on your right where they kept falling down on me. I had to come up with a new method to hold up the insulation.

The solution? An insulation corset.


I didn't want to use staples because it's hard for one person to hold the insulation up, pull the string tight and staple all at the same time. Also I don't have John's pneumatic staple gun set-up and regular staplers hurt my hands. (Youngsters, you will be amazed at what hurts you when you get just a little older - say, in your 50s.) So I hammered in some roofing nails because they have big heads on them and would hold the masonry string well. I chose masonry string because I figured it would pull taut and hold pretty well. I think it looks pretty good. Above shows the first layer of the 3 inch deep insulation.


And here is the full bay of insulation. I'm pretty happy with it. I will probably cover the seam between the Roxul insulation and the denim insulation with a band of the Roxul Rockboard that is left over from  John's house.

Denim insulation is a challenge to cut. It will not cut with a utility knife. Often people just end up tearing it which works pretty well though you won't get a good edge. I kind of do a sawing, tearing motion with a drywall saw.

Below you can see what the edge looks like.


So that was my insulation adventure today. I have 5 more 24" bays to insulate and 8 narrower bays. Tomorrow some more insulation will arrive. It is planned for my house, but I will use a few bales of it on this building.

I have not yet expanded on the topic of how much insulation should you use beyond the code requirements. That is coming as well.

Thank you for taking a look at my blog. I hope you are warm and comfortable.